Main

Tool Reviews Archives

February 9, 2006

Milwaukee Close Quarter Drill

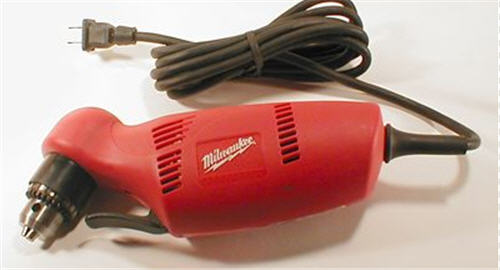
One of the tools I've liked for a long time is the Milwaukee close quarter drill. Some people might call it a "right angle drill" but the bit is really at an angle (55 degress) to the body which allows you to have some clearance for your hand. They are a bit uncommon, but so useful that they are worth giving a try. In case you haven't seen one, they look a bit like a duck:

milwaukee-0375-1-close-quarter-drill.jpg

That black thing near the chuck is a plastic shield to keep your fingers from getting torn up. The paddle switch is allows you to control it with one or all of your fingers. One thing to note is that it is easy to accidentally turn it on while changing bits. Usually the manufacturer recommends disconnecting the power while changing bits, or perhaps if you are daring you can hold the body with your thumb underneath the switch. The reverse switch is that little black bump near the back of the drill. It may seem inconvenient a lot of the time, but when you have one hand stuck in a tight space, having it at the back where your free hand can reach it is actually a good idea.

There are several advantages of this type of drilll:

  • The clearance needed to drill is much smaller. Depending on the length of the bit you can drill or drive screws in spaces much smaller than you can with an ordinary drill. I recently used it to mount drawer slides in a space less than 9 inches wide.
  • Where you grip the drill is much closer to the bit that you are driving. This gives you added control.
  • It looks more like a duck

Milwaukee makes both a 3/8" version (Model 0375-6) and a 1/2" version (0379-1). UPDATED: The old version is discontinued. Click here for my review of the replacement model 0370-20 I have the 3/8" and find it powerful enough. I'd think that the 1/2" would be heavier and more likely to break my wrist if it gets hung up in a tight space, but I could be wrong. Most 1/2" drills have an optional handle so you can hold them with both hands, but this does not and it would likely feel awkward boring big holes with it.

Regardless of the version the design of the drill makes it great for anything you need close control of. This means it is great for all light drilling and screw driving applications. The perfect drill to have around the house. Pair it up with a heavy duty 1/2" drill and you have just about everything you need.

Buy from Amazon

February 13, 2006

If I had a hammer... Estwing Framing Hammer

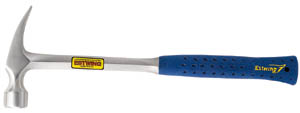
No one seems to use framing hammers that much anymore. Air-powered nailers can tack things together more quickly and without disturbing the work by banging on it. But the framing hammer should not be forgotten even if it is not just used for framing. With their substantial mass they are great for demolition or heavy hammering. In both of these cases my favorite hammer is one of these:
estwing-framing-hammer.jpg

The simple reason is that they are nearly indestructable. The nylon vinyl grip lasts forever. The head and shaft are one piece so the head can never come loose and even if you leave it out in the rain for a year or two you can just scrub off the surface rust and keep hammering. A wooden handle would never survive. Of course there is a downside. With such a solid piece of steel vibration is probably higher than you might get from wooden or composite handles, and the blue plastic handle is not as pretty as the leather or polished wood on some designer hammers, but as a basic big hammer, this is about the best I've seen.

February 28, 2006

Vise Grip Pliers

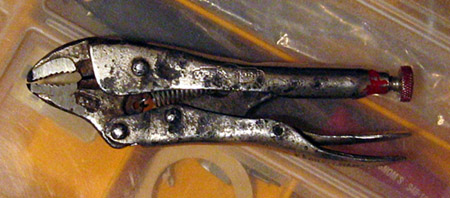
vise-grip-pliers.JPG

This pair of vise-grip pliers has been with me for about 20 years and were old when I got them. Vise-grip pliers were first patented in 1924 and have been made in various configurations ever since. Sometime in the 40's the patent expired and a bunch of knock-offs were created, but in my opinion, none of the cheap ones can rival the original. Generally the copies don't clamp as smoothly or feel awkward in the hand. The original Vise-Grips are contoured to fit your hand well.

I find that this seve inch pair works best for most things. They are small and light enough to fit in the toolbelt easily. The larger size is OK, but for bigger work I'd usually reach for channel-locks or lineman's pliers or a wrench so the smaller ones get more use. They also make a variety for clamping things while welding and for bending sheetmetal. The welding ones are OK, but the sheetmetal working ones are kind of a waste. I get better results beating on the tin with a block of wood.

The picture shows the only real problem with them - the plating is not that robust so they tend to get rust spots and corrosion and start looking bad. This doesn't affect their function much, and to be fair, these are quite old, but I have other old tools which don't look like this.

A small pair of these should be in every toolbox to hold and pinch things and even cut wire. Just don't use them on any fasteners you want to reuse.

March 21, 2006

Setting Things Straight - Stabila 187 Level Review

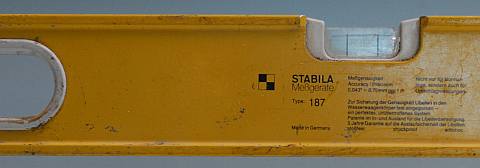
stabila-level.jpg

I've used bad and good levels. Some with broken or misadjusted vials, some "I-beam" levels which catch stuff in the flanges and the brand I finally settled on is Stabila. I haven't found anything better.

I prefer the 187 series to the 80 series level as they are designed for masonry which means they can be hit with trowels and the like. They are a bit heavier than the general purpose, but have the same basic function. The advantages are so simple and obvious that other level makers are now producing copies. Here is what I like about it.

  • Sealed box beam construction - doesn't trap stuff, no flanges to bend. Stable and resists twisting. Easy to wash when you are using with concrete/mortar.
  • Non-marking rubber end caps -allow you to more easily hold the level steady with one hand, bracing the rubber end against a wall or floor.
  • Big bright unbreakable sealed vials - don't break or get out of alignment. Work with the level both flat or on edge. The top vial is easily visible from above the level. This is IMPORTANT. Guaranteed for life...
  • Yellow - so I can find it.
  • Accurate - what good is a level which is not?

Of course it is not completely perfect. Occasionally I wish it was just an inch or two longer so I could use it as a straight edge to mark across 4' wide sheet goods (this may not be an issue with their newer levels which are allegedly 48"), and the price is somewhat higher than some others, but considering that the one I'm showing here has been at work in a couple of continents for more than a decade, the value of their solid construction is well worth paying for.

Stabila makes a wide range of levels including level sets for door framing, torpedo levels and magnetic levels. I don't have personal experience with any of these, so check them out carefully before you buy, but if they are anything like the 187 series, they are definitely worth a look. stabila-187-level.jpg

April 18, 2006

Pony 32400 ISD Hand Clamp Review

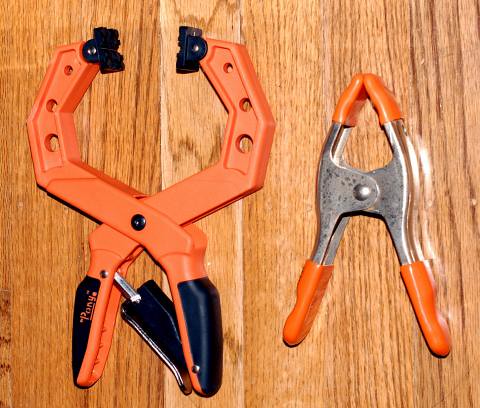
Clamps are important and generally you want them to do one thing - clamp. Unfortunately the Pony 32400 ISD (stands for "Innovative, Superior and Dependable") just doesn't work all that well. Here it is shown below alongside a typical spring clamp for scale.

Pony 32400 hand clamp

The problem is obvious if you look closely. Note the pivot point for the clamp. It is closer to the end of the handle than it is to the jaws. This means that the clamping force at the jaw is less than the force you apply at the handle.

Sure it is "Innovative" in the same way pliers with long jaws and short handles would be, but innovative does not mean the same thing as powerful or secure. Unfortunately, clamps are called upon to be both of those things. Even the simple spring clamp has the balance right. It uses the principle of the lever to give it a strong grip.

The second thing the Pony 32400 gets wrong is the release device. It pinches people. It pinched my son when he was trying to release the clamp and almost got me a couple of times. The last thing you want is for your own clamp to bite you.

The only thing that keeps from giving this an "avoid" rating is that it might be OK for someone who is doing really light duty clamping. In that case I can imagine that the longer reach may be useful, but I just found it was a bit short in clamping power for what I was trying to do. If they can come out with longer handles so you can apply more force, and fix the pinch problem I might reconsider, but for now it is just going to be a last resort while old fashioned screw clams or spring clamps get all the use.

April 22, 2006

Swanson Speed Square Review

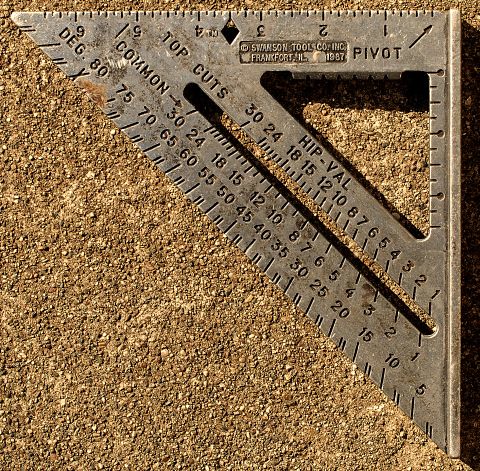
Swanson Speed Square

The Swanson speed square is an old favorite. It was invented in 1930 by Albert J. Johnson and has had a few additional features added over the years. The one I'm showing is from around 1988. They had just added that little diamond that you see which is at the 3 1/2 inch mark. The "diamond" is apparently their trademark.

The speed square combines a number of tools in one. It is a rafter square, miter square, try square, scribing guide, protractor and most notably a good saw guide. In profile it is shaped like a T, so if you want to make a quick square cut across some lumber with a circular saw you just slap this thing down, hold it with your left hand with the top of the T along the edge of the lumber and run your saw along the square edge of it. Being substantially thicker than a carpenters square, the saw won't easily ride up on the square.

I like this 6 inch version as it easily slips into a tool bag. They are pretty indestructable too. I think that all the models come with the "Little Blue Book" which explains the use of the rafter tables which are stamped into the tool. After about 20 years I'm not sure where that book is anymore, but it is pretty simple to figure out without it. This is the kind of tool you go out and buy again if you ever find you have lost it.
Update: Added an article on how to use swanson speed square here

April 30, 2006

Iwata HP-BCS Airbrush Review

Iwata-HP-BCS.jpg

Choosing an airbrush is difficult as each different airbrush involves a compromise of one sort or another. For example, go with a very precise high end airbrush like one of Iwata's "Custom Micron" series and get both precise lines as well as big prices for replacement parts. In the end it all comes down to how speciallzed your work is.

My uses for an airbrush are not specialized at all. I want it to do just about everything from painting small objects to stencils to artwork. For that reason I ended up with an Iwata HP-BCS. It has a large 0.5mm needle so I can spray pretty thick paints, but still has delicate enough control that I can produce fine lines. I thought originally that I'd want a cup style airbrush so I could more easily mix color, but then decided that the bottom-feed bottles let me mix up a large and consistant quantity at once instead of having to try and match what I had done before in a small cup.

The action on this brush is smooth and positive. Even a six year old can produce decent results with it once you set the air pressure correctly. Cleaning is fairly simple too, but letting it sit or running through incompatible paints can sometimes require disassembly to make sure it is completely clean. This is not a big problem though and some tuning of the workflow is probably all I need here.

On top of this, the price is right. You can probably find one for somewhat less than $100. I was considering the more expensive HP-CH, but it is about twice the price. It certainly offers the ability to paint finer details, but for now I'm quite satisfied with the HP-BCS.

May 10, 2006

Channel lock pliers vs. Ridgid Offset Hex Wrench

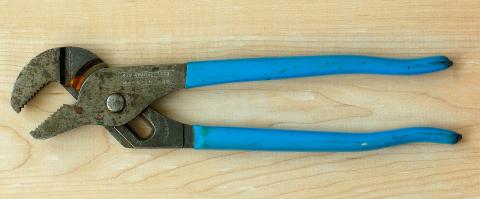
Selecting the right tool for the job is almost as important as knowing how to use the tool. The wrong tool can cause more damage than you intended. So in that line, this tool review is about two tools which are sometimes used for the same thing. The first up is the typical pair of sliding lock pliers. These are built by channel-lock and I've stuck with them over the years due to their quality. In case you wonder what I'm talking about, here is a picture:

channel-lock-pliers-s.jpg

I'm sure you've seen these blue handled pliers around somewhere. Their advantages are that they are fairly light, fairly cheap and they easily adjust across a wide range of opening sizes. You can grip everything from small parts to large items by opening them wide and sliding the jaws.

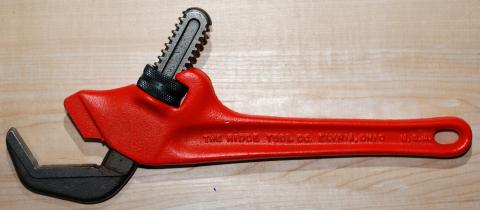
The challenger here is less common, but it is indispensable for certain tasks. It is the offset hex wrench. The one shown has smooth jaws which remain parallel as you adjust the wrench. Here is a picture:

offset-hex-wrench-s.jpg

This wrench is made by the Ridge Tool Company in Ohio. They are marketed under the "Ridgid" brand. In the past couple of years they have branched out from their high quality plumbing wrenches and now seem to be selling power-tools. Most of which are produced overseas.

So which is better? It depends on what you are doing with them. They have a few characteristics in common:

  • Adjust to handle a wide range of sizes (more than the typical crescent wrench)
  • Fairly light
  • Well made
The offset hex wrench has a number of advantages:
  • Smooth jaws won't chew up fittings
  • Opens even wider and deeper than the Channel-locks
  • Jaws are always parallel
  • Can add "cheater bar" on handle for extra leverage
  • Lifetime warranty against breakage
The Channel-locks also have a number of advantages:
  • Can grab irregularly shaped objects
  • Can be used to squeeze or crush items
  • Serrated jaws provide positive grip
  • Insulated handles
You can see from the handles of the tools and the rust spots that I use the channel-lock pliers a lot more. The offset wrench is exactly what you need to turn plumbing fittings or other smooth and regular nuts or bolts. The channel-locks are useful for grabbing and pinching things. They are not as good when they are used as a wrench - though they often are used for that and they leave a nasty mark when you do.

May 14, 2006

Japanese Ryoba Handsaw

japanese-ryoba-saw.jpg

If you haven't tried a Japanese two-sided (what is called a ryoba) saw, you should. Particularly if you are working with softwoods. There are a number of advantages over Western pattern saws:

  • The ryoba has a rip saw on one side and a cross-cut saw on the other.
  • The saw cuts on the pull stroke so it is under tension when cutting and won't bend or buckle when it sticks.
  • The blade is thinner which means less wood is cut and thus less effort is required.
  • The long handle helps you line up the cut.

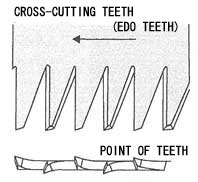
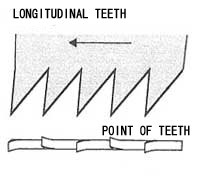
The first item on the list bears a bit of explaining. Saws are designed differently according to how they will cut the wood. In general, saws to cut across the grain (cross-cut) have blades which cut the wood. The edge of the tooth is shaped more like a knife and cuts the fibers of the wood. A rip saw which cuts with the grain of the wood has teeth which are shaped more like a chisel and take bites out of the wood. You can see the difference in these two illustrations:.

e-nokoha1.jpg e-nokoha3.jpg

Of course, Western pattern saws have advantages too. I think they show up more when cutting hardwoods though. I mostly am cutting softwoods and find that the ryoba is more useful to me than the classical Western saw. But here are the advantages of the Western saw:

  • Cuts on the push stroke so you can put some of the weight of your body behind it.
  • Thicker blade means that it is stiffer and may help you get started on a straighter cut.
  • Some find the typical pistol-grip handle wo tbe more comfortable.
  • Deeper tone when playing the saw
  • Sawdust ends up on the other side of the wood from you.

There are probably some more, but for now, there aren't enough to make me switch. It takes a bit of practice and some attention to your stance to use it well, but the same is true of almost any tool.

There are a number of other patterns of Japanese saws as well. Some are rounded so you can start cutting in the middle of a panel, others have reinforced backs like a Western backsaw. If you want to learn more and see some pictures of the other types of saws, this site offers a bit of history:

http://dougukan.jp/eng/dougu-e/e01noko.html

May 17, 2006

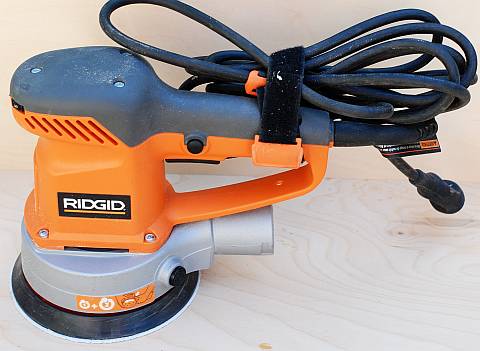
Ridgid 2610 6 inch Random Orbital Sander Review

Ridgid-2610-Random-Orbital-Sander-Review-Photo.jpg

Pictured is a Ridgid 2610 6 inch Random Orbital Sander (ROS). As with a large number of things nowadays, it isn't really made BY Ridgid, but is actually made in West Germany by Metabo. It is very nearly the same as their highly regarded Metabo SXE 450 Duo sander. The Metabo isn't easy to find in the US, but this tool can be picked up off the shelf at Home Depot for less money than the Metabo. As far as sanders go it is the best I've used. The positives are:

  • Smooootth - vibration and noise are minimal.
  • Adjustable - the orbital motion can be set to 1/4" or 1/8" eccentricity to allow fast removal or fine work
  • Positive dust collection hookup - the dust collector adapter has a twist lock connection so the hose doesn't come loose like some other brands. Adapter fits both 2" and 1 1/4" hose.
  • Massive - this helps when sanding flat surfaces...(see negatives)
  • Convenient - small touches like the illuminated plug identifier and the velco cord wrap just make life a bit easier when you have it plugged in with a bunch of other stuff. The removable front handle comes off easily to fit into corners better (not shown in picture)
  • Solid - I haven't used it for several years yet, but it certainly feels as if it can go the distance.

There are a few things which are not ideal about it however. In my opinion they are minor compared to the other benefits:

  • Does it have to be orange?
  • The mass which is useful on horizontal surfaces (basically it sands under it's own power and you just float it over to where you want it to sand) has to be overcome when working vertically. Being a 6" instead of a 5" is the biggest factor here.
  • 6" sandpaper is slightly less common so you may not see as much available if your local store has a limited selection of disks

Some thing to be careful of is that the 5" ridgid ROS is NOT the same. It is built to a different level of specification and was built in an entirely different factory in an entirely different country. In the future the 2610 or its follow-on may be built differently. Look for the "made it West Germany" marking and check the build quality in person if a new model comes out.

May 23, 2006

Stanley vs. Steve - Battle of the Planes

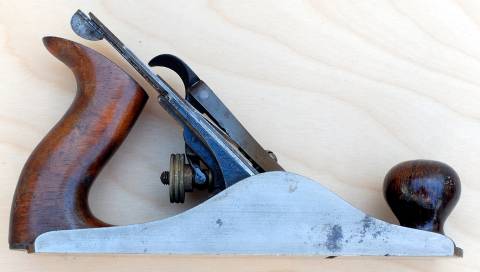
stanley-bailey-number4.jpg

This #4 Bailey plane is a refugee from sometime before WWII. I'm not sure exactly when it was made, but it is one of a large number of cast-iron planes which were common before the age of power tools. Of course, since it is cordless it is still usable. Cast iron planes like this had a few advantages over the wooden bodied planes they displaced.:

  • Levers and screws for adjusting the plane blade. The lever which is visible at the top of the plane skews the blade from side to side to make sure it is going to cut an even depth across the width of the blade. The brass adjusting knob sets the distance that the blade extends from the sole. This controls the depth of the cut.
  • Cast-iron bodies don't warp with changes in humidity (they rust)
  • Cast iron soles wear longer and therefore the mouth of the plane - essential for taking a fine cut - stays consistant over time.
  • They are easily mass-produced and the final adjustment can be made by the user.

This was probably one of the first planes I owned. I'm sure I picked it up at a garage sale or flea market, brought it home, sharpened it up and used it for things like planing door bottoms or putting a chamfer on posts. It is great for rough work. While it works well, it is not perfect. And in fact, getting better meant taking a step backwards.

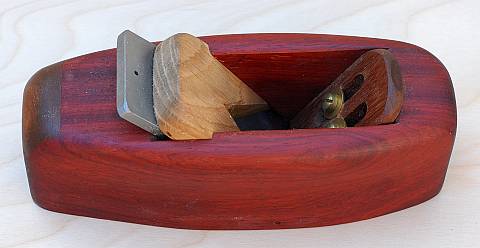
steve-knight-coffin-smoother.jpg

This is what I mean by going backwards. No more iron. No more screw/lever adjustments. Just a block of wood, a wedge, and a couple of set screws. This is a plane made by Steve Knight sometime early this century. Steve is one of a handful of retro-plane makers who take the designs of the past and re-interpret them in new materials or in differing ways. In this case, some of the woods are not traditional. The sole is made of Ipe - a hard tropical wood and the thing is laminated together using modern glues. The dark-brown l piece of wood is held in by a couple of screws and is used to control the width of the mouth of the plane as it wears. But really the biggest change between this and the other plane is the thickness of the blade.

As you can see from the two photos below, the Stanley blade is thin. It is about an eighth of an inch thick and thus is somewhat flexible. The chip-breaker (the curved piece above the blade) adds some minimal support to it, but it does not compare to the very thick blade on the Steve Knight smoother.

stanley-plane-blade.jpgknight-plane-blade.jpg

With this thicker blade, and a mouth that can be closed down to a very fine width, the Steve Knight plane can take much finer cuts than the Stanley ever did for me. It has a couple of other advantages as well:

  • Wooden body is warm and easy on the hands.
  • The shape allows shifting your grip depending on the direction you are planing
  • Slides well over the workpiece and is incapable of leaving a rust mark
  • Retro / Handmade feel
  • Thicker blade is easier to get a nice flat edge on.
  • Can flatten the sole quickly by running it over some sandpaper

There are some disadvantages to it. Adjustment is done by tapping the blade with a mallet. It can take a while to get the hang of that. Potentialy the wood could warp and twist, but so far it seems very stable in the moderate climate I live in.

So for fine work the victor of the battle is actually the simpler of the two. Of course for rougher work I still pull out the cast iron plane. Nothing wrong with having more than one tool for the job.

Some plane links:

  • For history and Identification of Stanley planes nothing beats Patrick Leach's "Blood and Gore" site
  • For more about Steve Knight's planes go to the source: Knight Toolworks
  • HNT Gordon offers some lovely wood and brass shoulder planes at their store.
  • St. James Bay offers a number of planes based on old designs.

There are a number of other boutique plane makers out there like those of Thomas Lie-Nielsen who updates classical designs or the new Veritas line of planes from Lee Valley which seek to add new features while updating traditional designs.

May 29, 2006

Bessey K Body Clamp Review

bessey-k-body-clamp-review.jpg

These clamps are great. The reason is simple. The wide square jaws stay parallel and don't bend out of square like some cheaper clamps - for example the blue Record clamps I bought which are almost useless because they flex so much. The jaw of the clamp travels very smoothly up and down the bar. Newer models are further improved with a removable end piece so that the clamping action can be reversed - turning the clamp into a spreader. Here are some of the advantages

  • Smooth
  • Powerful
  • Parallel non-stick, non-marring jaws
  • Reversible

There are a few accessories that go with them like blocks to set up 4 clamps to glue cabinet doors or drawers, and a clamp attachment which hooks on the bar and lets you clamp in a second direction. I have the clamp attachment and almost never use it. Disadvantages are that they are fairly heavy, and can be expensive. However, in the past few years they have been offered on sale at least once a year through Amazon, Lee Valley or other woodworking suppliers. Wait until then and stock up. You can't get a better woodworking clamp than these.

July 27, 2006

Hewlett Packard 42s Calculator

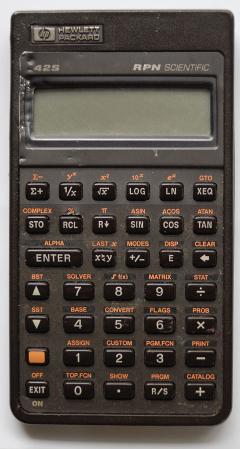
Hewlett-packard-42s-rpn-calculator-hp.jpg

It used to be said that calculators would create a generation of people who could not do math, and maybe that is correct, but in contrast this calculator really rewards those who understand mathematics. It is the Hewlett Packard 42s.

Before they became a printer company, Hewlett Packard used to make some of the best calculators in the world. Starting in the early 70's and continuing for about 20 years HP was the quality leader in calculators. Most of their calculators were designed for people who were serious about doing calculations and used what is called "Reverse Polish Notation" or RPN to enter and execute calculations. The 42s among others also added a stack which would hold interim values without having to explicitly store to memory. These two features combined enable complex calculations with ease.

Of course, understanding this or the 600 functions built into the calculator introduced the user to a bewildering array of math concepts. I don't think I still understand exactly what all of the functions would be used for, but the calculator not only does the complex but also makes the simple things simple. The two line display shows what numbers you are working with. The functions I use most often are represented with actual keys. The remaining functions are available through "soft keys" which appear on the display just above the top row of keys.

One of the other distinguishing attributes of HP calculators is their durability. Those marks along the left side were from when my dog decided to chew on it. No problems. It is still working 14 years later. There is a story about an HP12C which made it intact and still operable after a pass through the digestive tract of a hippopotamus.

October 5, 2006

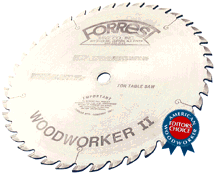
Forrest Woodworker II Table Saw Blade Review

forrestt woodworker II table saw blade

I am far from trying out all of the possible table saw blades, but after putting this blade on my saw it is hardly worth bothering looking further. There is nothing to complain about. Out of the box the blade is sharpened to perfection and aligned so well that cut surfaces are smooth as a planed surface. Ripping performance is slightly behind that of a dedicated ripping blade (Forrest makes one of those too...) but for everything I do this blade is more than enough.

Some random notes:

  • Buy the 1/8" rather than the 3/32" blade unless you have a saw with a marginal motor. The 1/8" blade is stiffer and less susceptible to bending/warping etc.
  • Accurate sharpening is the key to clean cutting. The blade comes with packaging and instructions on how to return it to Forrest for re-sharpening. I believe they will also sharpen blades from other manufacturers too.
  • Keep an old crappy blade for cutting wood which you have kept in the dirt behind the shed for a few years. Embedded sand and dirt can do bad things to a blade.
  • Forrest sells "blade stabilizers" to make the blade even less prone to vibration etc. Personally I think that is bordering on gimmick. A well aligned saw and good techique are probably bigger factors in the quality of cut than a blade stabilizer would be. Work on those two first.

The Forrest Woodworker Two may not be the holy grail, but it is good enough that you won't need to be looking any further. Just buy it.

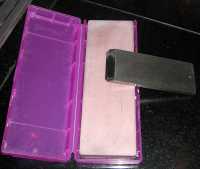
Shapton Waterstone Review

sharpening_with_shapton_waterstone.jpg

I've written about sharpening with waterstones before. In general their advantage is that they cut quickly and clean up just as quickly. Nowadays the majority of the stones use are manufactured rather than mined, but there are still significant differences between them. In my opinion, the Shapton Professional Series Whetstones by Shapton are the best.

Why? Well, they don't require a long soak before they are useable. They don't seem to load up like some others I've tried. They wear longer than any other I've seen. And they are produced to tight tolerances so you can expect them to be flat and precisely to the grade that you expect. There are no unexpected larger grains of grit like you may find in a natural waterstone.

I have #1500, #5000 and #8000 grit stones. I think starting with a #1000 grit instead of #1500 would be a good idea though. It would help shape blades a bit faster. The #8000 produces a mirror finish and an edge easily sharp enough to shave with. Going to #15000 or #30000 seems like overkill to me.

Putting a sharp edge on your tools and cooking knives makes things go so much more smoothly. Take a few minutes and bring them back better than new.

October 13, 2006

Two Headed Japanese Nailset - Nitoku Kugshime

japanese nailset nitokukugshime.jpg

One of the things that is wrong with ordinary nailsets is that the hammer is too far from the head of the nail. This gives more room for a glancing blow. The solution is to use a Japanese nailset (also called a nitokukugishime 二徳釘しめ) which has both the traditional long orientation, but also can be used the short way. This gives a very positive and secure feel, especially useful when dealing with air-driven brads or finish nails which can have a tendency to bend if not struck just right.

There are a couple of other less obvious advantages. The right angle and the square cross section give a good grip and keep it from rolling away from you. The larger size and smooth taper lets you use it as a wedge or as a mini-spud to align holes in two different objects.

November 19, 2006

Grizzly 1023S Table saw Review

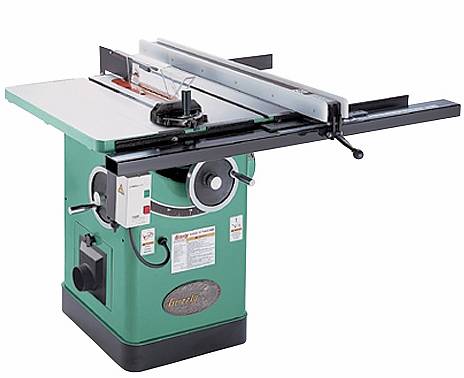
Grizzly-1023S-1023SL-Tablesaw.jpg

A table saw is almost a necessity when doing woodwork. It handles the job of ripping, crosscutting and dadoing with ease. The biggest problem with them is choosing one. There are a few criteria that need to be sorted through:

  • Cabinet Saw vs. Hybrid Saw vs. Contractor's Saw vs. Benchtop.
  • 240 volts vs. 120 volts
  • Left Tilt vs. Right Tilt
  • Accuracy (both short and long term - durability influences this greatly)
  • Cost

Choosing between the different types of saws is probably the easiest part. In the list above it goes from least portable to most portable. Cabinet saws are typically defined by having enclosed bases and are usually built to a heavy standard - examples of this would be Delta's Unisaw, the General 350 etc. Contractors saws are lighter in construction for portability, but still have a reasonably sized working area. The powermatic 64 series saws are an example. Hybrid saws are a cross between the two. Typically with that sort of thing you end up with a "worst of both worlds" thing. And benchtop saws are saws which fit on your workbench, though an increasing amount of them now include stands of one sort or another . Ryobi's BTS series is an example of this. They are all light enough and small enough to wheel around or carry.

The need for portability is something that can have a strong influence on the choice you make. Good luck moving your cabinet saw around to anywhere other than the flat surfaces near your shop. On the other hand, Benchtop saws can go almost anywhere and are found anywhere remodellers are working. Having the saw next to you when you are inside a bathroom on the third floor is invaluable.

The reverse of portability is capability. Bigger heavier saws can do everything a smaller lighter saw can do, but they do it with greater ease (due to larger tables, bigger motors, less vibration, greater precision). As you move down the scale, you are not moving to a smaller higher precision tool . This is unlike a jeweler's screwdriver which is usually smaller and more precise than its bigger brothers. Smaller lighter saws can be engineered to be very efficient, but at a certain point, you give up the rigidity of a bigger saw with heavy cast trunions. The basic function is to spin a saw blade in the same spot. The better it can hold it exactly in that position the better your cuts will be.

Making a choice on voltage is also pretty simple. Higher voltage usually means that more power can be supplied to the motor. Saws running off 120 V power are limited to 1 1/2 to 2 horsepower as that is all a typical 120 V circuit can supply. Moving to 240 gives the ability to use a 3 or 5 HP motor. It also limits portability because most homes have few 240 V circuits. Higher power motors tend to last longer since they are not running at their peak load as much as a smaller motor might. In my experience they are a bit quieter too.

Left tilt vs. Right tilt is a something a lot of people get caught up in. A google search will show up arguments bringing up things such as which way you spin the nut to hold the blade or figuring out the effect of a change in Dado blade stack height. In my opinion, the differences aren't very significant. From a safety perspective, it is probably best to use whatever you are most familiar and comfortable with.

In discussing size earlier, I hinted at accuracy. Bigger usually means that the body of the saw and the assembly that holds the motor and blade are heavier and stouter. For this reason they offer the potential of more precision in adjustment, and a better likelyhood that the settings will stay the way you set them even if you knock things about a bit. Beyond that there is accuracy in machining and setting up the saw. Almost all saws can benefit from aligning the blade and the fence correctly and it is covered in their instructions so I will skip the details here. Consider it a necessary step for all saws, even the most precisely milled and polished ones. Of course talking about accuracy when you are dealing with wood is an interesting topic. Wood moves, swells, shrinks, twists etc. Some extra polishing on the work surfaces is probably not going to affect the results your saw produces. As long as the saw is reasonably flat and set up well, you should be getting good cuts. Of course, your ego may demand more...

With all these critieria in mind how did I end up choosing the Grizzly 1023? Well, it was big enough, I don't need to take it anywhere. It is powerful enough. It lives in the garage so 240V power was not a problem. I'm used to a right tilt saw (which was at the time nearly $100 cheaper than the left tilt). And it is built to standards which are good enough for all that I require from it. I could have spent a lot more and not gotten much more out of it. And, I'm glad I didn't. I haven't been disappointed in any way.
December 3, 2006

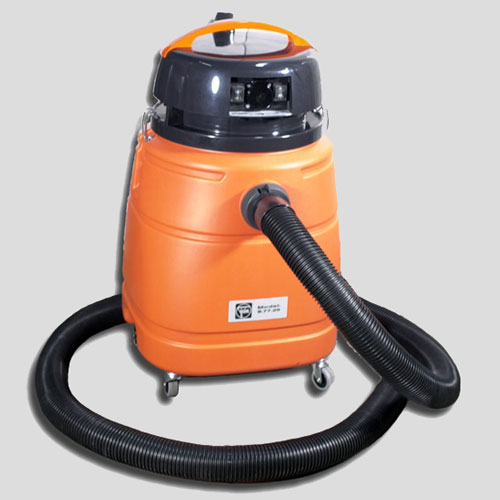
Fein Turbo III Shop Vac Review

Fein_Turbo_III_Shop_Vac_9-77-25.jpg

$300 for a shop vac? Well yes, but it is worth it. I've heard my share of screaming shop vacs, and even home vacuums, but when you hear, or don't hear the sound of this machine it is well worth the expense. Fein claims 57.8 decibels at 3.5 feet which is quiet enough to talk over, or to use inside without ear protection. I used it today to pick fir needles off the living room floor and it was quieter than my 3 year-old who wanted to use it.

One of my favorite features is the autostart. Plug any tool into the 20 Amp outlet and the vac will start at the time you start the tool and continue for a few seconds after you finish. This is perfect for sanders, drills or anyother handtools with a dust port.

Suction is more than adequate. It is claimed to lift 99 inches of water, though a ten foot hose full of that much water would get rather heavy. Airflow is great too. When you really look at it, the differences that really matter between shop vacs are noise and reliability. Sucking power is generally about equal. Because of this choosing the Fein over the others (like the Milwaukee 8927, Porter-Cable 7814 or Ridgid WD1665) is an easy decision.

I should point out the one shortcoming of the Fein. It doesn't come with anything to put on the end of the hose except for a funnel shaped thing and a piece of rubber tube. There is an accessory pack, but just head down to your nearest home center and get some generic attachements.

The Turbo III ( 9-77-25) has two little brothers, the Turbo II (Model 9-55-13) and the Turbo (Model 9-11-55). They share the same auto-start capability, but use a hose which is half the diameter. This reduces airflow and may limit the size of the stuff you are picking up. But if size is a consideration, you may want to consider them.

January 8, 2007

Left vs. Right Tilt Table Saws

My review of the Grizzly 1023 tablesaw drew quite a few people looking to decide between Left and Right tilting table saws, so here is my thinking on the issue:

First the advantages of a left-tilt:

  • Motor on the left means the bevel wheel is on the right, good for right handers
  • Blade tilts away from the fence meaning that it is less likely to trap the wood between the fence and the blade. Trapped wood = BAD. It moves fast when it breaks out of the trap
  • Uses a regular right-hand thread nut to fasten the blade and the nut is on the right side of the blade, good for right handers.
  • When cutting a piece with bevels on both sides (trapezoidal) the point of the wood rides along the middle of the fence instead of at the bottom where it might slip under the fence.
  • The motor is usually inside the cabinet instead of sticking out. This may give you more room under the wing and make fitting a door easier.

The advantages of a right tilt:

  • The distance from blade to fence is not changed if you change the blade. On a left tilt, fitting a dado or a thinner blade will change the distance and make your scale read incorrectly
  • Use your left hand to control bevel angle, good for left handers.
  • Left hand threaded arbor nut means you can change the blade from the back of the saw where the blade is closer and use your right hand.
  • You can always switch the fence to the other side of the blade so that bevel thing I wrote above is not really a disadvantage.
  • Some saws are cheaper in right hand tilt than left hand tilt.

It looks like the reasons are slightly tilted in favor of the left hand for right handed users and the opposite for lefties. My first suggestion is go with what you are comfortable with. Neither one has a huge advantage over the other in terms of safety.

Powermatic has always built most of their saws with left-tilt and they are regarded pretty highly. Delta, historically, has been right tilt, but they are shifting to the left on newer models. Jet and Grizzly offer you a choice. I'd put the direction that the blade tilts as pretty far down on the list of criteria and would focus on accuracy, reliability and value first.

January 12, 2007

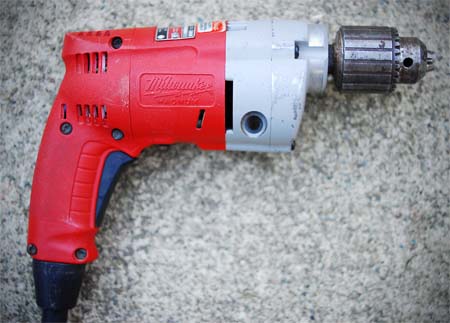
Milwaukee Magnum 1/2" Drill Model 0234-6 Review

Milwaukee_0234-6_Drill_motor.jpg

Mikwaukee Holeshooter... How do I love thee? Let me count the ways:

  1. Built like a rock (compare to the newer model 0300-20 which is clearly "value-engineered" and it shows)
  2. Never ever needs charging
  3. Regular old-fashioned keyed Jacobs chuck. A keyless chuck is not appropriate for the amount of torque this puts out.
  4. Trigger as smooth as any I've ever used
  5. Lasts almost forever. I've seen these in heavy use for more than a decade.
  6. Quik-loc feature is handy if you are the type that damages cords, otherwise it is a small pain, but at least you are sure that it is unplugged
  7. Great balance, if not a little heavy. You can use it one handed without the side handle.
  8. Powerful enough to handle most drilling jobs and even mixing drywall mud and the like
  9. Smooth from the lowest speed to the highest
  10. Brush replacement can't get much simpler than this

This is really one of those tools you want to buy once. Spend a bit more for it because it is built to outlast the others, even newer tools from Milwaukee. Ignore the 5.5 amps vs. 8 amps difference and pick this one over the Model 0300. It is a pound lighter and has a more robust side handle. The model 300 is awkwardly positioned between the 0234 and the larger and more powerful Hole Hawg series. 8 amps is really too much to hold with one hand for long. As for comparison with others like Dewalt DW235G (too light and cheap feeling - pick one up and see), Hitachi D13VF (too heavy and powerful for a handheld- will break your wrist) or even the Bosch 1013VSR (cheezy side handle and not so comfortable to hold), there isn't really much comparison.

This (and a 3/8" close quarter drill like this) will pretty much cover everything you need up to the point you are driving big self-feeding bits and bracing the drill against your thigh. They really got it right and there is a good reason that the tool has remained in production for more than 15 years. I think I bought the one shown in the picture (it is a model 0234-1) in 1990 or so and the new ones are almost exactly the same. At the time I wrote this, Amazon was selling it for $99. How can you beat that?!

September 4, 2007

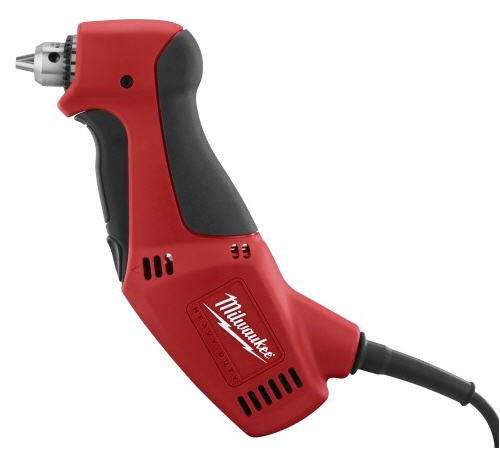
New Milwaukee Close Quarter Drill Review 0370-20

milwaukee-0370-20-close-quarter-drill.jpg

I've written before about Milwaukee's close quarter drills (also called "right-angle" drills) and was glad to see that the new version Model 0370-20 3/8" close quarter drill improves upon the old one. First, let's cover what is better about it.

  • The housing has been redesigned so that the teeth on the chuck are no longer in close proximity to your fingers and the work. As far as I can see, they shouldn't be able to contact the work if it is flat. I'm not sure if this limits how close you can get in a corner, but it is a welcome change.
  • The main switch and reverse switch have been redesigned and put in a logical place. On the old model the reverse switch was at the back of the tool so it took two hands to reverse.
  • The cord now comes out of the back instead of the bottom. I think this may not improve the balance of the tool, but the cord is now out of the way in tight spaces.
  • They put rubber grippy stuff on it. The earliest versions of this drill were shiny and smooth - which means they got slippery when you start sweating. This one is grippy and has an octagonal shape to the grip which should improve grip and also alignment.

The older version was reputed to be build by Sioux and re-badged by Milwaukee. It was pretty obvious that the design and even the materials were slightly different from the rest of the line. Now it is just like another member of the family. We won't know for a while about the longevity, but if it is like the other milwaukee drills then it should be a very worthwhile investment.

Oh, the one disadvantage is that it no longer looks like a duck. And I haven't seen a 1/2" version.

November 25, 2007

New Tools - Craftsman Folding Utility Knife

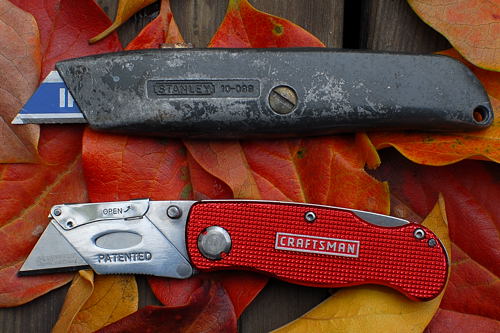
Stanley-10-099-vs-craftsman-folding-utility-knife.jpg

Some things never change, or at least that is what I thought. The old Stanley 10-099 utility knife has been around forever. But in the past few years there have been a bunch of new twists on it. One of them is the folding utility knife. This craftsman model flips open just like a regular lockblade knife. Flip the lever up and the side rotates down so you can change the blade without any tools.

But this flash comes at a price... There is no room for spare blades which is almost a fatal flaw. The aluminum handle is filled with dimples for drywall mud and other stuff to hide in. You can't just wipe it clean. And last, the whole blade is always exposed when it is open. The retractable blade on the Stanley allows you to extend only as much as you need so you can set the depth of cut allowing you to easily score materials.

The folding knife is smaller and flashier. If you work only with clean materials it would be a great choice, but for drywall and throwing in the tool belt, the venerable 10-099 is still champion.

About Tool Reviews

This page contains an archive of all entries posted to Stuff in the Tool Reviews category. They are listed from oldest to newest.

Tool History is the previous category.

Many more can be found on the main index page or by looking through the archives.

Creative Commons License
This weblog is licensed under a Creative Commons License.
Powered by
Movable Type 3.34