Since I published the first review of the Swanson Speed Square, many people have been wondering how to use it. There are actually a large number of things you can do with it, but the most common is probably to use it the same way a framing square is used - to determine the correct angle to cut rafters.I'll show you how to determine the angle you need to use.
But before we get there, a couple words on how the pitch or slope of rafters is stated. In the US, rafter slope is typically given in terms like "4 in 12" or "12 in 12". The first would be close to the minimum slope for a shingled roof and refers to a vertical rise of 4 inches for every horizontal run of 12 inches. The reason that 12 is used as the denominator is that by doing so it is easy to do the math. If you have a 10 foot run, and a pitch of 4 in 12, you simply multiply the 10 by 4 and arrive at a vertical rise of 40 inches.
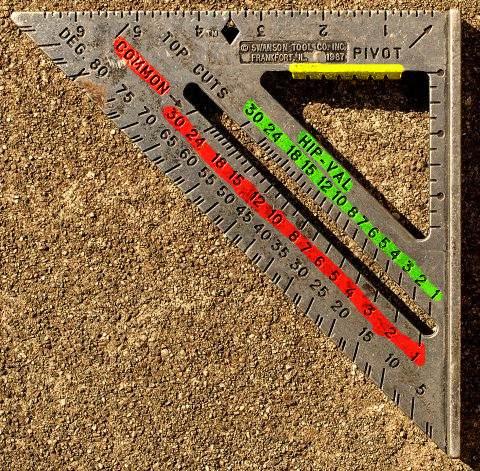
Now, calculating the correct angle for a common rafter is simple with a little trigonometry, but the speed square takes away the need to drag out a calculator. Just set the pivot at the edge of the board and then rotate the square around that point until the edge of the board aligns with the correct mark on the "Common" scale - marked in red in the picture. Then draw a line along the ruled side of the square (the one parallel with the yellow mark). You can see that at "12 in 12" the edge will make a 45% line.
For hips and valley rafters, the angle is slightly different because the ridge itself is at an angle. This is a bit more difficult to do the math for, but once again, the speed square takes away the need to do math. Just do the same procedure as for common rafters, but instead use the "Hip-Val" scale. You will see that because the boards meet at an angle the cut is not as steep.
One thing the speed square won't do for you is determine rafter lengths. However, simple geometry will tell you that the square root of (rise-squared + run-squared) will give you the length of the other side of the triangle. For this you may need a calculator.
One other feature which I've found useful at times is the scribe feature. In the area marked in yellow in the picture you see a number of notches a quarter of an inch apart. You can set a pencil in the notch and slide the square along the board and have a mark parallel to the edge.
As you can see, the speedsquare is rather coarse in its markings. That isn't to say it is not accurate, but rather, the fineness of the markings is better suited to wood framing rather than fine woodworking. So buy one of these and throw it in your toolbags. It should last a long time.

Comments (15)
Thanx guys. I'm an electrician trying to learn more about the other trades the right way. This has been very useful. As you know we use alot of the same in conduit bending.
Posted by Bryan | May 17, 2006 11:13 PM
Posted on May 17, 2006 23:13
had a speed square for years,but didn,t know how to use it,there wasn't any instructions that came with it,but now,thanks to you,i can use it for more then 45's and squaring.
Posted by arthur | June 7, 2006 1:30 PM
Posted on June 7, 2006 13:30
I have owned a speed square for years. I knew it could be used to quickly determine the cuts for rafters, but I never understood how the framers used it. Thank you for your explaination.
Posted by Toni | November 30, 2006 6:52 PM
Posted on November 30, 2006 18:52
Great info. Actually I use the Diamond feature to scribe out markings for studs at 3.5". Also you can use the Diamond to quickly layout "birdsmouth's or seat cuts on rafters by aligning the points of the diamond with the plumb mark on the tail of the rafter. Swanson's Blue book shows this on page 18.
Posted by Craig | December 7, 2006 3:43 PM
Posted on December 7, 2006 15:43
Any idea what the markings adjacent to the yellow ones are for?
Yes, the ones with dots are inches. The smaller ones are quarter inches. You can see that the maximum is 3 1/2", the width of a 2x4 piece of lumber. Much of the speed square was designed around the 2x4. -Jack
Posted by Daniel | January 21, 2007 9:23 AM
Posted on January 21, 2007 09:23
Yeah I figured that much. I'm wondering what they would be useful for though...
Posted by Daniel | January 21, 2007 6:41 PM
Posted on January 21, 2007 18:41
i learned how to use a speed square a while ago, there is one thing that does baffles me. What are the two marks by 80 degress and 5 inches
Posted by Tomcat | February 25, 2007 1:35 AM
Posted on February 25, 2007 01:35
I know the answer to Tomcat's question as I have a Speed Square with instructions.
It is used for setting out the "heel cut" (birdsmouth?): it is a right-angle to the edge of the square showing degrees.
Line up these marks with the plumb line (minimum rafter length) and the horizontal part of heel cut lies along degree edge. In Swanson's example, distance from the marks to 45° is 3-1/2 inches.
Posted by Topaz | March 12, 2007 5:17 PM
Posted on March 12, 2007 17:17
how do you use this for the angle to cut for valleys and hips?
Posted by noris | July 6, 2007 6:02 PM
Posted on July 6, 2007 18:02
Need illustration how to use swanson speed square
Posted by W T Haley | July 29, 2007 8:32 PM
Posted on July 29, 2007 20:32
what is hip-val and common im trying to build a small hip roof porch and im having a hard time doing it. plz repost on this site .. ty bill
Posted by bill | May 21, 2008 2:41 AM
Posted on May 21, 2008 02:41
i am looking a copy of the swanson rafter and stair cuting book.this book gives spans down to feet inches 1/8 inches. its a hard back blue book
Posted by joehwatson | September 17, 2008 7:16 AM
Posted on September 17, 2008 07:16
you a**hole bastard this speed square fell apart the first day you b*tch
Posted by Anonymous | April 28, 2009 5:40 PM
Posted on April 28, 2009 17:40
I have an existing Window Sill that I need to determine the angle that it is, so I can Frame it. How do I use the speed square to do this, instead of hit and miss.
Thanks,
Stephen Ayers
Posted by Stephen Ayers | September 2, 2009 3:03 PM
Posted on September 2, 2009 15:03
Would like to know how to measure the pitch with this tool. Trying to get the angle of rafters for this dog house I am building. Really sucks when you don’t have the proper tools (miter saw for example). The dog house plans can be seen here,
http://206.130.118.243/docs/diy/index.htm
http://206.130.118.243/docs/diy/roof.htm
In this article, you said "One thing the speed square won't do for you is determine rafter lengths. However, simple geometry will tell you that the square root of (rise-squared + run-squared) will give you the length of the other side of the triangle. For this you may need a calculator." The front and back sides are 30 X 36 and the instructions said the lower end of the roof would be at 23 3/4 inches, and then the center of course is 28 inches. How would I know the angle from these dement ions, and also know the angle for the bottom edge of the rafter? Been wasting quite a few pieces of wood trying to g4t this right, of course a miter saw would help tremendously.
Thanks for any help you can offer.
Posted by Janelle | November 14, 2010 4:30 AM
Posted on November 14, 2010 04:30