February 22, 2010

How to load 4x5 sheet film holders

Loading 4x5 sheet film holders is not difficult except that you have to do it in the dark. This post shows and tells how to do it so you will not make a mistake.

4x5 Film comes in a nested set of boxes. There are three in total:

Nested-Sheet-Film-Box.jpg

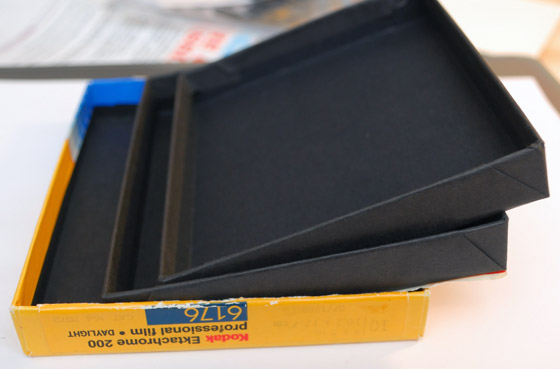
When you open them the boxes will be arranged so that the inner box is closed and then the outer box closes on top of that:

Nested-Sheet-Film-Box-2.jpg

Inside that there may be either a plastic bag or a foil envelope depending on the film brand. Kodak usually uses an envelope that you have to rip open. Ilford uses a plastic bag which is folded over. Inside this the film is sandwiched between two sheets of cardboard.

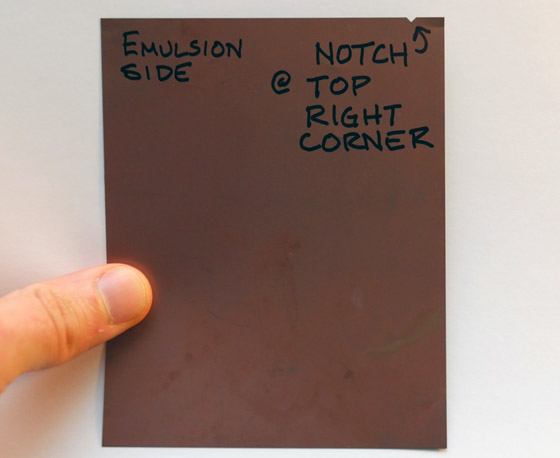
When you get the bag open you can tell the orientation of the film by the notch. It should be in the upper right corner if the emulsion side is facing you.

sheet-film-notch-in-upper-right-corner.jpg

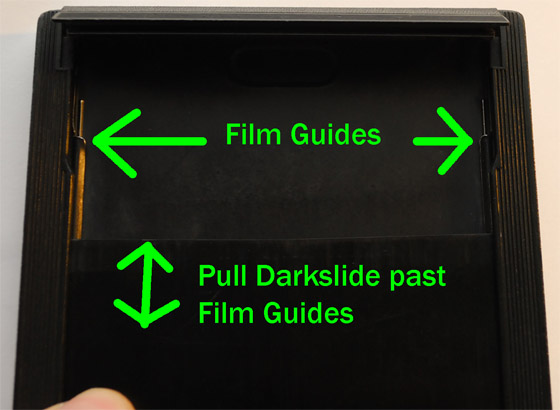
Before loading the film holder I usually get it ready by pulling the darkslide out about two inches. This way I don't need to fumble for the darkslide and I can also easily see if I have loaded the film correctly (you'll see this in the following step). About a half inch below the edge of the film holder will be the film guides. The film fits under these guides. Design of the guides varies with the type of film holder, but open yours and take a look at them in daylight before you start loading film.

Film-Holder-Guides.jpg

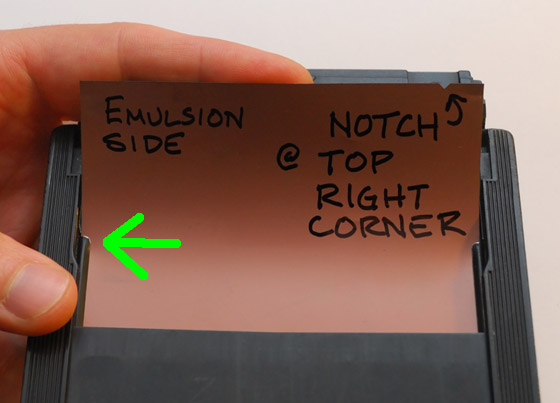
Insert the film under the guides with the emulsion side out. Note the notch in the upper right corner. After the film is inserted I bend it out slightly as shown. If the film is not in the guide correctly it will flop out. In that case, pull it back out gently and try again. It is not uncommon to get one side of the film on top of the guide so be certain that the film is inserted correctly.

4x5-film-in-holder.jpg

The final step is to slide the darkslide all the way in. The most common convention is to have the white or silver side of the darkslide facing out when the film is unexposed and then when you expose the film you return the darkslide with the black side facing out. The darkslide itself has a series of raised bumps or other indication on the upper right light side. This way you can tell in the dark if you have them inserted the right way.

Darkslide-with-raised-bumps.jpg

January 5, 2010

Bosch SHU43 Dishwasher Repair - Dishwasher keeps running

My Bosch dishwasher was broken recently. It kept running for hours. Here is how I fixed it:

First, the symptoms: The dishwasher would run for a long time... hours. It didn't really get things clean. When the door opened the inside was not warm.

The first step was running the built-in diagnostics. To do this press the Power Scrub and Regular Wash buttons at the same time, then press the power button. One of the lights will show up.

If the WASH light shows, that indicates a heating fault
If the RINSE/DRY light shows, that indicates a filling fault
If the CLEAN light shows, that indicates a NTC (Temperature Sensor) fault.

Mine showed WASH so there was a heating fault. When this shows it can be a problem with the heating element or the electronics.

One of the common problems with this dishwasher is that the solder joint for the heating circuit can burn out. It is pretty simple to fix if you have a soldering iron and a torx screwdriver (#20 size). The circuit board should be checked before replacing the heating element because it is faster and easier to check and repair.

Step 1 is to unplug the dishwasher. Even though the wires to the power switch are insulated, it is always a good idea to make sure there is no power going to the dishwasher.

Step 2 is to remove the Fascia - the front part of the dishwasher with the buttons on it. To do this you use a torx #20 screwdriver. Open the door and remove the screws from along the top edge of the door. Remove the two screws from the side which hold the control panel in place. I also remove the two screws at the top of the front panel to make it easier to get the control panel in and out.

Removing-Control-Module-01.jpg

Once the screws are removed, the control panel can be pulled up and forward to free it from the door.

Once this is done, disconnect the wires holding it in place. First the connectors to the control module:

Bosch-SHU43-Control-Panel.jpg

Then the connectors to the Power Switch and the Ground Wire:

Disconnect-Power-Switch-And-Ground-Wire.jpg

When these are disconnected, you can remove the panel entirely and set it on a soft surface. It is possible to skip disconnecting the wires, but it requires juggling a half-open door and a wobbly control panel while you try to unclip the control module.

The next step is to unclip the control module. There are plastic clips at both sides that need to be opened and then the module rotates free with a hinge at the upper side:

Unclip by sliding a flat screwdriver or other tool under. Do not bend too far or you risk breaking off the clip.

Remove-Bosch-SHU43-Control-Module-Clip.jpg

Remove-Second-Clip.jpg

Swing the top up so you can get to the next set of clips which hold the circuit board in position. These are similar to the first set, but smaller. You can use your fingers to release them.

remove-Bosch-Dishwasher-SHU43-Circuit-board.jpg

remove-circuit-board-second-clip.jpg

Once those clips are open, you can pull the circuit board up to see the back side.

repair-heater-circuit-solder-joint-bosch-shu43-dishwasher.jpg

Once it is visible, look for a burned solder joint near the middle of the board as shown in the photos. It will look something like this:

bosch-heater-circuit-board-repair-shu43016.jpg

Clean the joint with an x-acto knife or whatever else you can use. Then get out the soldering iron and resolder the joint. Put it back together in the reverse order you took it apart. Don't forget to plug it back in!

Test by running a wash cycle. If the heater comes on and the wash cycle is back to normal times (about 90 minutes) then you have fixed it.

If you can't succeed in repairing it, the whole module is typically available for about $150

December 24, 2009

Two new blogs added

This one is for children's arts and crafts

This blog covers Legos, NXT and other interesting things.

Expect both of them to grow slowly.

November 5, 2009

Tale of two cycles

It was the best of times

It was the worst of times

In the 70's I liked things on two wheels. I always wanted a nice bicycle with chrome forks and stays, Reynold's 531 tubing and alloy rims. But I didn't have one.

Instead I had a Yamaha RD400 with alloy rims, drilled brake disks and clubman handlebars. I had a great time on it, even though it wanted to throw you off the back when you twisted the throttle too hard.

But times have changed. Now, courtesy of a local garage sale I have that 70's bicycle with chrome forks and stays, 531 tubing and a Brooks Professional seat. The flexy French PX10 Peugeot is as vintage as it can get. But on the other hand, I don't have an RD400, just the memory.

June 6, 2009

Making a new strap for an old Rolleiflex camera

rolleiflex-strap-lug

Rolleiflexes often came with a leather "EverReady" case - often dubbed "NeverReady" because they are hard to put on and take off to do something as simple as put in a new roll of film. Mine is old and cracked and useless, so I needed a new strap and this is the one I made.

Get a strip of latigo leather - this is the type of leather that belts and straps are typically made of and is stronger than some of the other types.

With a skivver (a sort of leather shaver) or a knife or a plane (what I used), thin the leather down at the ends until it fits through the guides on the side of the camera.

Punch a hole the size of the post and then make a slit above the hole to make room to fit it over the head of the post.

Then slip the leather through the guide and work the post through the hole and slit you made.

I made two short pieces which fit on each side and joined them with a buckle to make a short hand strap. I also made a longer piece which can buckle onto the ends of the short pieces to extend it and convert to a neck strap.

May 19, 2009

Shubb Deluxe Capo Review

shubb-capo

A capo clamps on the neck of a guitar just behind one of the frets and allows you to easily change the key that you are playing in without changing the fingering - or the inverse, lets you change the fingering without changing the key, but if you are reading this review you probably already know that. Slipping a capo on can completely change the tone of your guitar from a loud and boomy strummer to a quiet finger-picker.

The easy way to make a capo is with a rubber band and a pencil, but some rubber bands can rot the finish on the guitar and the pencil can roll about and buzz. So a whole science of capo's has come about. There are capos like the Dunlop and Kyser which are like a clothes pin and clamp on using spring force. There are those like the Victor and Planet Waves and Elliot which use a screw clamp and there is the Shubb which uses a lever and roller.

The advantage of the Shubb design is that you can never put it on too tightly - a too tight capo pulls your strings out of tune. The lever design goes on and off quickly. I guess I should mention that it is so solidly built that unless you drive over it with your car, it probably won't wear out in your lifetime. My favorite model is the Shubb Deluxe due to the all stainless steel construction and the roller on the lever. It rides in a little track and makes operation very smooth.

The disadvantages are that when you remove this capo, you have to put it somewhere. Spring clip capos can clamp on the headstock, but you will probably want to slip the small Shubb into your pocket. Even though it is pretty small, it is solidly constructed of stainless steel so it may be a bit heavier than aluminum models, but it will last longer as well. The Shubb Deluxe capo is well worth the price paid.

May 1, 2009

Corona Aluminum Handle Bypass Loppers Review

These are the best loppers I've used. I've broken the handles on a couple of wood handled loppers over the years, but the aluminum handles on these are both stronger and lighter and can get wet without cracking and getting splintery. They are also replaceable as are the cutting blades. You can take the blade off pretty easily to sharpen it when the need arises too.

The bypass style doesn't give quite as much leverage as you would get with a geared anvil type lopper, but I think that the blades stay sharp longer with this style, and there is plenty of leverage for cutting anything that you would use a lopper on. Anything too big to cut whith these you should be sawing anyway. But note that if you are frequently cutting bigger branches you should get the type with 31" handles instead of the 24".

You can see a bit of rust near the blades from the times when SOMEONE in the house has left them out in the rain or sprinklers, but the plastic coated handles are fine even after long exposure to the sun.

One minor feature which bears mention is the set of rubber pads you can see right near the pivot point. They really do work to cushion the impact you get when the blades cut through, Anvil cutters meet with a sharp snap. These cut past the end and then those rubber pads cushion the blow. When you are chopping a lot of stuff, the little touches make your day nicer. Occasionally I tuck one handle under my arm and cut one handed. In that position, a soft cut is appreciated!

Overall, I don't think you could do much better than these loppers. I'd buy another pair, but I have a feeling this 10 year old pair is not going to wear out anytime soon. Mine is an older model so it does not have the "Stratashear" teflon-coated blades like the #AL 8240, but they are fine without it.

July 31, 2008

Poison Oak - Leaves of Three

JD2_0164
What you see here is poison oak also known as "Toxicodendron diversilobum". It can be found in much of California. The reason it is called poison oak is that there is an oil within the plant called "Urushiol" which causes mild to extreme itching if you get it on your skin. There are a number of home and commercial remedies (the cheapest is probably washing with VERY hot water - this releases and depletes the histamines which cause itching) but the best thing is to just avoid contact altogether.

From the picture you can see several of the key characteristics. The three leaves are one of the most well known identifiers and there is even a rhyme "leaves of three, let it be" to help remember. Oak leaves have a similar shape but do not come in groups of three. Poison oak also grows on a woody vine and frequently climbs trees or stands as a low bush. The color is also a good indicator. It is green in spring and gradually turns reddish and then brown in the fall. When green the leaves are a bit shiny, but as they age they lose some of the shine.

Poison oak can also be recognized by the small white berries it produces. They are about the size of a pea. But you don't need to see the berries to know it is poison oak. The leaves tell the whole story.

If you have come in contact with poison oak, the best thing to do is wash as soon as possible. Because the urushiol is an oil, use soap or other detergents when washing. Water alone won't help much in removing it from your skin. The sooner you wash the better because once it starts to soak into your skin, it won't be easy to get it off.

It can contaminate clothing as well, so if you have been through an area with a lot of poison oak, make sure to wash them well.

All in all, the best strategy is to be able to identify it, and then avoid it.

November 25, 2007

New Tools - Crescent Sliding Wrench

sliding-crescent-wrench.jpg

Here is another update to a tool which has been unchanged for years - the Crescent Wrench. The slider on the handle opens and closes the wrench. Sliding the handle rotates a bronze rod which turns the worm gear which controls the wrench opening. Having the adjust be so quick and positive is really an improvement.

Another nice feature is the scale on the wrench face which tells how wide it is open. One side is marked in inches and the other in millimeters. This is useful when you are trying to figure out what size wrench to use after you have rounded the corners with the Crescent wrench.

The only negative about this wrench is the added bulk and weight. I think that the convenience and speed of adjustment more than make up for it though.

sliding-crescent-wrench-adjustment.jpg

New Tools - Craftsman Folding Utility Knife

Stanley-10-099-vs-craftsman-folding-utility-knife.jpg

Some things never change, or at least that is what I thought. The old Stanley 10-099 utility knife has been around forever. But in the past few years there have been a bunch of new twists on it. One of them is the folding utility knife. This craftsman model flips open just like a regular lockblade knife. Flip the lever up and the side rotates down so you can change the blade without any tools.

But this flash comes at a price... There is no room for spare blades which is almost a fatal flaw. The aluminum handle is filled with dimples for drywall mud and other stuff to hide in. You can't just wipe it clean. And last, the whole blade is always exposed when it is open. The retractable blade on the Stanley allows you to extend only as much as you need so you can set the depth of cut allowing you to easily score materials.

The folding knife is smaller and flashier. If you work only with clean materials it would be a great choice, but for drywall and throwing in the tool belt, the venerable 10-099 is still champion.

September 26, 2007

reset mp3 player m240d

Poor Dvorak. Always suspecting conspiracy when keyword stuffing is enough.

September 4, 2007

New Milwaukee Close Quarter Drill Review 0370-20

milwaukee-0370-20-close-quarter-drill.jpg

I've written before about Milwaukee's close quarter drills (also called "right-angle" drills) and was glad to see that the new version Model 0370-20 3/8" close quarter drill improves upon the old one. First, let's cover what is better about it.

  • The housing has been redesigned so that the teeth on the chuck are no longer in close proximity to your fingers and the work. As far as I can see, they shouldn't be able to contact the work if it is flat. I'm not sure if this limits how close you can get in a corner, but it is a welcome change.
  • The main switch and reverse switch have been redesigned and put in a logical place. On the old model the reverse switch was at the back of the tool so it took two hands to reverse.
  • The cord now comes out of the back instead of the bottom. I think this may not improve the balance of the tool, but the cord is now out of the way in tight spaces.
  • They put rubber grippy stuff on it. The earliest versions of this drill were shiny and smooth - which means they got slippery when you start sweating. This one is grippy and has an octagonal shape to the grip which should improve grip and also alignment.

The older version was reputed to be build by Sioux and re-badged by Milwaukee. It was pretty obvious that the design and even the materials were slightly different from the rest of the line. Now it is just like another member of the family. We won't know for a while about the longevity, but if it is like the other milwaukee drills then it should be a very worthwhile investment.

Oh, the one disadvantage is that it no longer looks like a duck. And I haven't seen a 1/2" version.

September 2, 2007

Sanyo Eneloop Rechargable Battery Review

Eneloop rechargable batteries

I'm so glad to see that Sanyo finally delivered what I really want, rechargable batteries that work when I want them to. Often I want them to work weeks or months after I last charged them, but most NiMH (Nickel Metal Hydride) rechargables self discharge pretty fast and there is no charge left when I need it. With the eneloops, you can charge them after you last used them and chances are there will still be charge left weeks or months later.

I've put them in flashlights and camera flashes, both items you don't use often, but you want them to work when you need them. And I've very happy with their performance and shelf life. They come pre-charged from the factory so you can even start using them right away. The self discharge rate is dependent on ambient temperature, so they will hold a charge longer when stored in cooler temperatures. I'm not sure they are what you want if you leave a flashlight in your car trunk all summer, but they are perfect for things like flashlights, remote controls, cameras, clocks and other things which require a low self-discharge rate.

With the price of non-rechargable batteries and the toxic materials they contain, it only makes sense to use a battery which is capable of being re-used a number of time. I highly recommend the eneloops.

I've seen them available both with and without a charger. You can use any 1-5 hour battery charger to charge them so if you already have a charger, you can probably use it. The eneloop charger is a slick white thing which matches the battery design and it is not that expensive. High speed chargers (1/2 hour) are likely to create a lot of heat in the cells - that is not usually a good thing.

They are available in AA and AAA sizes.

August 31, 2007

Abalone Iron and Floatline

float-line-and-abalone-iron.jpg

The California Abalone is a big gastropod and adheres to the rocks it lives on very tightly. This makes removal of them a tricky process. When the fringe of the abalone detects a visitor, the thick muscle pulls the creature tight against the rock. So to get them off the rock you need to slip one of these stout abalone irons under the shell very quickly, surprising the abalone and not allowing them to suck down tight. The edges are rounded so that it doesn't cut the abalone.

There are a wide variety of abalone irons, but it is probably a good idea to pick one with a built-in gauge. Divers are required to carry a measurement device with them whenever diving for abalone and having it built-in to the iron helps.

The other thing shown in this picture is a floatline. This one I made by feeding some fluorescent orange line through a length of polyethelene tubing. The ends are sealed with some plugs with a stainless steel ring at each end. I put some heat shrink tubing on there to neaten things up. The float line is then tied to the end of the abalone iron. It does not float enough to lift the iron, but it does float up and mark the spot where the iron is. So, when diving in rough murky conditions where the swell and current are moving you about, you may find an abalone lurking but not have enough breath left to spend time to remove it from the rock. Or you may want to come back to the spot for a second look. So all you need to do is drop the iron right there and surface for another breath. Then when you are ready, follow the line back down to where you were.

The float line also allows you to determine how deep you are diving or how deep the water is where you are. I'd consider it an essential accessory for any abalone or sea urchin diver.

float-line-end.jpg

June 24, 2007

Lego Mindstorms NXT Review

lego nxt robot

That pair of eyes on the front is an ultrasonic distance sensor for the Lego NXT robot. My 10 year old put this together to carry a video camera around the house and avoid bumping into stuff.

The NXT is at the top of the Lego hill and is a great place for people to start exploring both robotics and software development. The box in the middle is the controller which has ports to control and run motors and to get input from a variety of different sensors. The sensors included in the kit are touch, light, distance and sound sensors, but other companies also sell things like compasses, accelerometers, color sensors, IR seekers etc...

The NXT also comes with its own visual programming environment. It comes with a few tutorial projects which exhibit the basic functions. I think that most 8-10 year olds should be able to follow them, but getting beyond the tutorials takes some interest and experimentation. Making connections between the different programming blocks is done by simply dragging and dropping the output so it is fairly simple, but understanding loops and conditional branching is probably something that would not be suitable for an 8 year old. The box recommends for 10 and up and I agree with that recommendation.

The strong point of the NXT as a software learning platform is that it gives immediate physical output. You can write code and your robot actually moves or makes noises. This is not always true when you are just writing software. Their output is two dimensional. On top of this kids get to think about how to build a structure which is capable of doing something. The Lego pieces are easy to put together in different configurations that the focus in on shaping the construction to do what you want rather than trying to put it together.

Bill Gates has identified robotics as one of the key technologies in the coming decades. In my opinion home-built robots are still in the same phase as early computers were. A great way to get started in this is with the NXT. I highly recommend it.

Link to Lego Mindstorms home page

Previous 10 entries...

reset mp3 player m240d Sep 26, 2007
New Milwaukee Close Quarter Drill Review 0370-20 Sep 4, 2007
Sanyo Eneloop Rechargable Battery Review Sep 2, 2007
Abalone Iron and Floatline Aug 31, 2007
Lego Mindstorms NXT Review Jun 24, 2007
How to use a Vernier Scale Jun 4, 2007
Zooomr - Sooonr or Laaatr Jun 1, 2007
Squaring Walls and Foundations using diagonals and the 3 4 5 Right Triangle May 3, 2007
Marking - Knife vs. Pen vs. Pencil vs. Brush vs. Crayon! Jan 26, 2007
Upgrading a Macbook Jan 23, 2007