Page 5 of 16

June 24, 2008

The Cashmere Bikini

There once was a King who asked his two tailors for the finest materials in the land... Oh forget it...

Recently a couple of EPM research reports have crossed my inbox. The first is Gartner's Magic Quadrant for IT Project and Portfolio Management and the second, The Changing Face of Project Management based on research done by Loudhouse Research and promoted by CA. Both of these reports rubbed me the wrong way as they seem to be missing the obvious and recommending that the "best" choice is the most fully-featured.

Gartner's summary contains the statement: "The value of PPM lies in the relatedness of the functions supported". Their Magic Quadrant (tm) has "completeness of vision" on one axis and "ability to execute" on the other. The best place to be in this chart is in the upper right, high on both axes. I tried to figure out why this bothered me and came to the realization that "vision" is really not something that I'd invest in.

What is the value of "vision"? How much would you pay for it? Would you pay more for "results" than you would for "vision"? For those of you without the document in front of you, "ability to execute" does not refer to results of the tool, but rather the ability of the company supplying the tool to execute their vision. I think that "vision" is a great starting point, but it is not always the best vision which is successful and valuable. Dreams of more features may fill the CIO's head, but it is only realized vision which fills the coffers.

In a highly integrated PPM environment, successful integration requires tailoring the system to the organizations specific needs. Perhaps a simpler or more targeted solution would be better. And the skill of those implementing it is critical to success. You can make terrible clothes from wonderful fabric.

The CA report was much more irritating as it contained a basic flaw - a willful ignorance of the research data. The data was gathered from a large swath of IT organizations and the answers given to the question "why projects do not come in on budget" were overwhelmingly scope related. The results were:

  • Inaccurate scoping/forecasting (50%)
  • Scope creep (39%)
  • Project interdependencies (36%)
  • Lack of skilled resources (28%)
  • Poorly defined scope (26%)
  • Other (2%)

So with scope being the root cause of most project management issues, one would think that the summary would mention it. How surprised would you be to find that scope management was not mentioned? It wasn't. Not at all. Rather the conclusions focus on having IT Directors have better visibility over their portfolio, Better reporting and better forecasting and better "visibility" are the recommended solution to this state of affairs. In my opinion, this is like saying a better dashboard will make your car run better - and saying this with a straight face while there are loud banging noises and smoke issuing from under the hood. The problem with "vision" is that it involves the eyes only and does not include the smells, sounds, shaking and heat coming from your organization.

I don't mean to rant about industry analysts. There is really good stuff to think about in the reports and the analysts are just a reflection of what their clients are interested in so they are not to blame.

But I can't help wondering where is the focus on delivering business value? Where is the attention to fixing the root causes that the research plainly exposes? How does this research and these recommendations actually help an organization do better? Is it up to the tool vendors to supply the vision? Or do IT managers and CIO's need to really look at their organization and determine what will help them?

Something is missing here and I'm still trying to put my finger on exactly what it is.

June 22, 2008

Longest and Shortest Day of the Year

Summer

Summer is finally here in the Northern Hemisphere - Friday being the longest day of the year and one of the hottest so far. However, we should not forget that it is the beginning of Winter in the Southern Hemisphere.

June 16, 2008

Long Now Orrery

Everybody leaves off Pluto. This eight foot tall model of the solar system is part of the Long Now project which started around the idea that people think and act in timeframes which are very short. This orrery and a clock are designed around a 10,000 year life span in order to start people thinking about the long term.

However the object itself I find to be a bit of a tech fetish item, a modern worship of metallurgy and craftsmanship that bears a definite 2nd Millenium stamp.

Details about it can be found here and if you are ever in Fort Mason along San Francisco's waterfront you can drop in and see it put into action by one of the curators.

VBA and Visual Basic For ... to ... statements

Most of the Microsoft Project or Excel macros I write include looping through a collection of tasks or resources or assignments and use the a For Each ... Next loop, but that doesn't mean we should neglect the For ... to ...Next statement.

This statement uses a counter which you set to determine how many times it runs. The syntax is as follows:

For counter = start To end [Step step] [statements] [Exit For] [statements] Next [counter]

counter is the number of times that the loop will run. It is a required input to the statement. The most common terms used for counter are the lower case letters starting with i. When dealing with arrays or other sorts of multidimensional data it is common to end up with nested For...Next statements so sticking to a standard convention helps you keep your place. An example of nested statements is:

For i = 1 to 10
For j from 1 to 10
myArray(i,j) = i * j
Next j
Next i

The next part is the start parameter. This is often just an integer like 0 or 1, but you can pass any numeric vaue to it. End is similar, but it is more likely to be a variable something like ActiveProject.Tasks.Count or UBound(myArray()) work nicely.

The final piece of the puzzle is the step value. Step can be any integer both positive OR negative. I've used negative step values when deleting or inserting tasks as the task ID can change if you insert or delete a task, so working from the last task to the first is a good idea. Here is an example of deleting blank tasks working from the last task in the active project and working your way back to the top:

For i = ActiveProject.Tasks.Count To 1 Step -1
If ActiveProject.Tasks(i) Is Nothing Then
SelectRow Row:=i, rowrelative:=False
EditDelete
End If
Next i

The value of the counter i can even be set within the statement, but be aware that this can cause problems. It is certainly possible to create an endless loop this way. It can also be more difficult to debug. Do it only if you have to.

June 12, 2008

VBA to VSTO Tutorial Part Two - Adding a Command Bar and Buttons

In my previous tutorial on using VSTO to create a Microsoft Project Add-in, I covered what is necessary to create an Add-in which displays a simple form but most of the time we don't want the form to show up every time. A better way to do this is to add a tool bar (aka: CommmandBar) and some buttons / icons (aka: CommandBarButtons). This way if your add-in is installed it can have its own toolbar which users can click if they want to perform some action or display a form. Project 2003 and Project 2007 still use the same sort of command bar and command bar button interface as earlier versions of Office Applications. If you are creating an Add-in for Excel 2007 or Word 2007 you will be working with the new Ribbon interface. I'll write about that when Project catches up with that interface...

Adding a Command Bar / Tool Bar to the Microsoft Project Interface

This installment covers how to add a command bar and a couple of buttons. If you have not read the first tutorial you should go back and read it here.

The first thing to do is to define the objects we are going to use. We want them available from any other object in our add-in so define them right at the top. The command bar is going to use two buttons only. One will display a form with buttons and other controls. The other will display a form with "About" information on it.

Public Class ThisAddIn
Dim commandBar as Office.CommandBar
Dim firstButton as Office.CommandBarButton
Dim secondButton as Office.CommandBarButton

A Subprocedure to Add the Command Bar

The next thing to do is to add the command bar. I've put this in its own subprocedure so tha I can easily reuse the code in another add-in or if I want to add multiple command bars to the same add-in. It takes a string barName as the name of the bar. This code should be really simple, but we want to make sure that we have the latest version of the command bar so first we check to see if the bar exists. If it does then we delete it and add it again.

Private Sub addToolBar(ByVal barName As String)
Try
commandBar = Application.CommandBars(barName)
Catch ex As ArgumentException
' Toolbar does not exist so we should create it later
End Try
If Not commandBar Is Nothing Then
Application.CommandBars(barName).Delete()
End If

Application.CommandBars.Add(barName, 1, False, False)
commandBar = Application.CommandBars(barName)
End Sub

Adding Buttons to the Command Bar

The next step is to add the buttons to the toolbar. Once again I'm writing this as a subprocedure so that I can easily reuse it or modify it. The names of the buttons are hardcoded but you could add them as a parameter as well if you feel like it.

Private Sub addButton(ByVal cBarName As String)
commandBar = Application.CommandBars(cBarName)
Try
' Add a button to the command bar and create an event handler.
firstButton = CType(commandBar.Controls.Add(1), Office.CommandBarButton)
firstButton.Style = Office.MsoButtonStyle.msoButtonCaption
firstButton.Caption = "Monte Carlo"
firstButton.Tag = "montecarlo"
AddHandler firstButton.Click, AddressOf Button1Click
' Add a second button to the command bar and create an event handler.
secondButton = CType(commandBar.Controls.Add(1), Office.CommandBarButton)
secondButton.Style = Office.MsoButtonStyle.msoButtonCaption
secondButton.Caption = "about"
secondButton.Tag = "about"
AddHandler secondButton.Click, AddressOf Button2Click
commandBar.Visible = True Catch ex As Exception
MsgBox(ex.Message)
End Try
End Sub

Adding Handlers for Button Clicks

If we run these two subprocedures we get a tool bar and add two buttons to it. Next we need to set up what the buttons should do. Similar to any button control, we use an event handler (defined above). The first button will create and show our master form.

Private Sub Button1Click(ByVal ctrl As Office.CommandBarButton, ByRef Cancel As Boolean)
Dim monteCarlo As New fmMonteCarlo
monteCarlo.Show()
End Sub

We do a similar thing for the "About" form.

Private Sub Button2Click(ByVal ctrl As Office.CommandBarButton, ByRef Cancel As Boolean)
Dim aBox As New AboutBox1
aBox.Show()
End Sub

Run when Add-in Starts

The next thing to do is to make sure that these subprocedures run when the add-in starts. We put the two subprocedures in the "Startup" event for the addin.

Private Sub ThisAddIn_Startup(ByVal sender As Object, ByVal e As System.EventArgs) Handles Me.Startup
...
addToolBar("Monte Carlo")
addButton("Monte Carlo")
...
End Sub

Cleaning Up at the End

The very final thing to do is clean up after ourselves. If a user wants to remove or unload the add-in we would expect that the command bar would go away as well. To do this we just delete the command bar in the Shutdown event for the Add-in.

Private Sub ThisAddIn_Shutdown(ByVal sender As Object, ByVal e As System.EventArgs) Handles Me.Shutdown
Application.CommandBars("Monte Carlo").Delete()
...
End Sub

With this and the previous tutorial you should be able to get through the initial hurdles that you face moving from VBA to VSTO and should be able to create and deploy a Project 2007 Add-in that adds a command bar and displays a form. And you should be able to create a form with some simple controls and code. From this point on, coding in visual basic using Visual Studio 2008 is very similar to using VBA.

June 9, 2008

Speaking in Gibberish and Writing Constantly

This article in Scientic American hints at some potential health-related impacts of blogging (all positive by the way). According to the article:

expressive writing produces many physiological benefits. Research shows that it improves memory and sleep, boosts immune cell activity and reduces viral load in AIDS patients, and even speeds healing after surgery.

Now, I'm not certain how "expressive" an article about VBA and VSTO can be... so it may not be helping me much at all, but it may help YOU to sleep.

Of course it may be possible to take a contrary view and suggest that people actually blog because they are ill. The article in describing the physiology of the brain related to writing suggest that the temporal lobes (which govern speech) may be involved as well. Then as proof cites Wernicke's aphasia which appears to be rooted in the temporal lobes:

People with Wernicke’s aphasia speak in gibberish and often write constantly. In light of these traits, Flaherty speculates that some activity in this area could foster the urge to blog.

Uh huh, gibberish, constant writing, bloggers... all cut from the same cloth.

May 29, 2008

Project Management Immaturity Model

I usually save the humor until Friday, but Crispin (Kik) Piney sent me a copy of his Project Management Immaturity Model which lists the maturity levels that other models such as CMMI and OPM3 leave out. Read it and learn how the familiar 5 levels:

5: optimising
4: managed
3: defined
2: repeatable
1: initial

are extended into a full nine levels with the addition of:

0: incompetent
-1: obstructive
-2: antagonistic
-3: psychotic

Download the Project Management Immaturity Model PDF

May 21, 2008

Making the move from VBA to VSTO in Microsoft Project

One of the most useful features of Microsoft Project is the ability to automate actions with it. Primarily this is done by writing VBA (Visual Basic for Applications) code, or by just recording a macro and then editing the VBA code that the macro recorder produces. But a few years back Microsoft came out with VSTO (Visual Studio Tools for Office) which allow you to more easily write code to automate office applications within Visual Studio which is their main line programming environment.

For a long time I ignored VSTO because it didn't live up to the promise it made. It was clumsy to use and difficult to deploy the applications. I also avoided it because I couldn't get the project add-in templates to work.

However, with Visual Studio 2008 they provided two things which make it much easier for the casual developer to use. The first is what they call "ClickOnce" deployment. What this means is that you can easily deploy by publishing your solution to a local drive, a website (HTTP) on a CD/DVD or even USB locations. Deployment also supports offline, automatic updating and rollback. The second is an improved template for building a Project Add-in. At the MVP summit there was a lot of talk of using VSTO as a way to automate Project, so I gave it another chance and I like what I found. It took a while to get up to speed, so I decided to post a tutorial showing how to create a simple add-in. Here it is:

Starting a New Add-in

This tutorial assumes you have Microsoft Visual Studio 2008 installed. The first step is to open Visual studio and from the "File" menu, select "New Project...". This brings up the "New Project" dialog box.

01-New-Project-in-VSTO.jpg

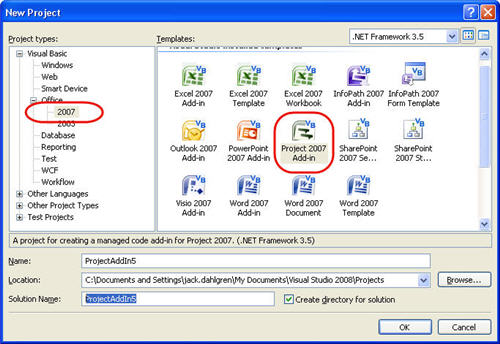
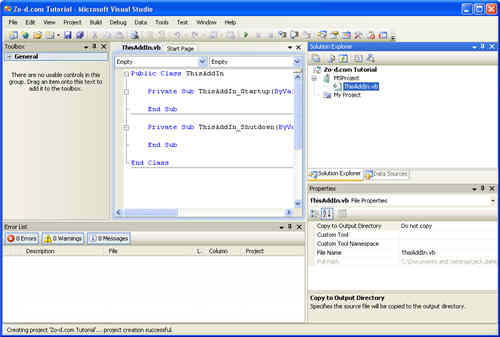
In this case I'm using Visual Basic as the language as it is closest to VBA so it is easier for me to deal with. Expand the "Project Type" tree on the left to find "Visual Basic/Office/2007" then enter a name for your solution. If you do not enter a descriptive name now you will regret it later. Highlight "Project 2007 Add-in" and click "OK". The solution will be displayed with two subroutines, one which occurs when the add-in opens and the other when it closes.

thisaddin-vb.jpg

Adding a Form to Your VSTO Solution

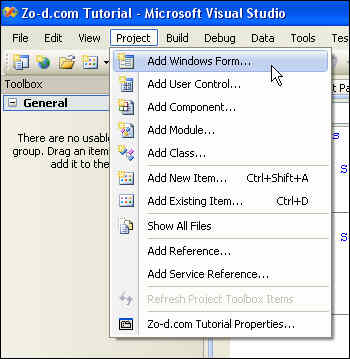
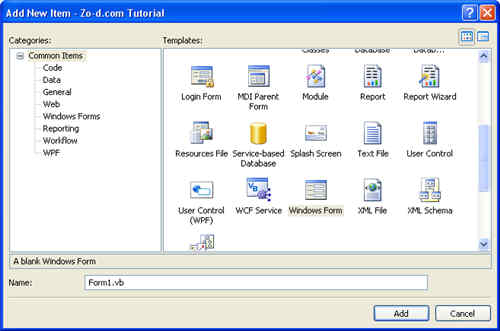
In most cases you want the user to be able to do something. That means we need to provide some sort of user interface. In this simple case we are just going to display a user form. To add a form go to the "Project" menu and select "Add Windows Form..."

add-a-windows-form.jpg

In the dialog box that appears you can see all of the other types of objects you can add to your project. Things like the splash screen allow you easily build some commonly used user interface elements. But for now, we need just one form.

add-a-new-item-dialog.jpg

Once you have added the form you will see the form itself in the design window in the center of the screen. You should also see it in the "Solution Explorer" on the upper right side of the screen. The design window is tabbed so you can see the original thisaddin.vb code tab behind the current "Form1.vb" tab.

the-new-form.jpg

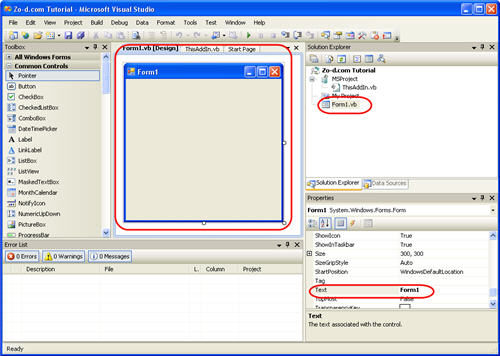
The new form is just like a user form in Project VBA. You can edit the Text property to give it a new name in the title bar. Set it however you would like. There are a number of different properties which you can set for font, color, size, behavior etc. Try playing around with some of them. There is one property we really want to set for this form, topmost property should be set to True so that the form always stays visible on top of the application.

Adding Controls to the Form

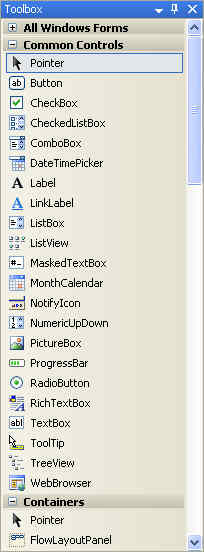
Now that we have the form we want to put some controls on it. For those who aren't familiar with using forms, a control is typically just something on the form - a label perhaps or a button, textbox or perhaps something more complex like a date picker. The next screenshot shows the common controls in the toolbox. There are many other controls available as well. One of the biggest advantage of using an Add-in rather than a VBA user form is that there are a much wider variety of controls available. The Windows forms also offer standard things like the ability to easily resize the form.

Visual Studio 2008 common controls toolbox vb

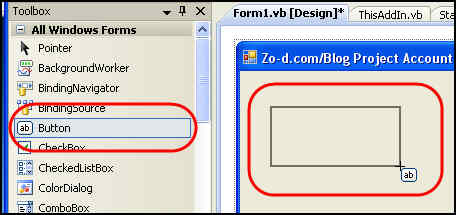
To keep this example really simple I am just going to add one button and one label. Clicking on the button will count the tasks in the active project and then put that value in the label. To do this we just select the button control in the toolbox. When it is selected the cursor will change as shown below. Then just click and drag anywhere on the form to create the size and shape of button you want.

adding a button to a windows form.jpg

The button will be created with a name like "Button1". If you are going to change the name of the button, this is the best time to do it. Make sure the button is selected and then in the "Properties" box at the lower right side of the screen find the "Name" property at the top of the list. Edit it to whatever you like. I usually name the button with the action that they are going to perform. This one I call "btnCountTasks". When you have renamed the button, you will notice that the text on the button has not changed. It still reads "Button1". Scroll a bit further down the list of properties and set the "Text" property to "Count Tasks". You can look at some of the other properties while you are there, but to keep things simple don't change any of the other properties.

Writing Code for a Windows Forms Button

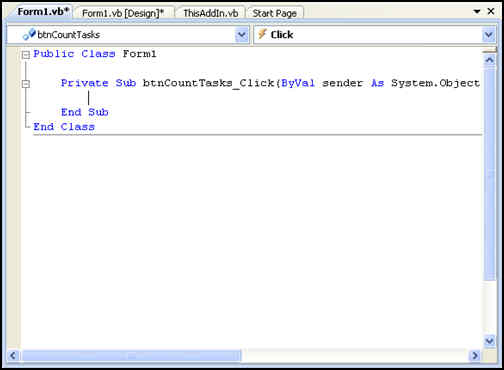
The next step is to write some code so that clicking on the button actually does something. Double Click on the button and Visual Studio will automatically switch to the code view for the form. It will also automatically create a handler which will run whenever you click the button.

writing code for the button click event

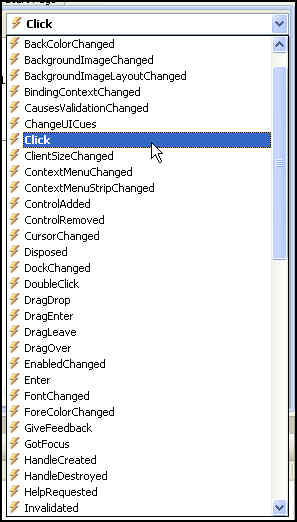
If you want to create a handler for a different event, select the appropriate event from the drop down list of events at the right top corner of the window. If the event exists it will be shown in bold and selecting it will take you to that section of code. If it doesn't exist, then the shell of the handler will be created for you.

event-list.jpg

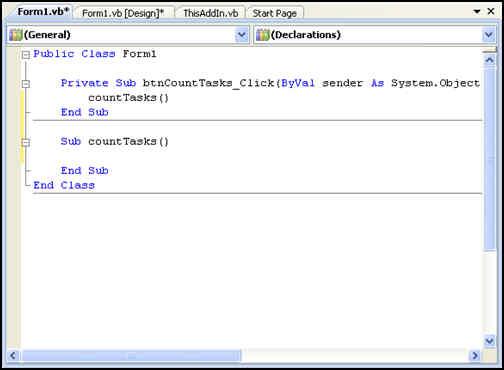
When the event handler is created the cursor is sitting there waiting for you to type code. At this point you could simply start writing code, but to make things easier and more modular, I prefer to have a button click call a sub-routine. That way another button can call the same sub-routine. It also makes writing and debugging the code easier. So the only thing we are going to do is call the sub-routine I'll call "countTasks".

To do this, select a line outside of the event handler and type "sub countTasks()". The editor will create an end for it and a blank line for your code. Now go back to the event handler and on the blank line there write "countTasks". You now have a button which when clicked will run the countTasks sub-routine.

running-a-subroutine.jpg

Refering to the Project Application and Active Project

Up until now we have just been working within Visual Studio and have not been making any references to Microsoft Project. We are about to get started with that. In this example we are just going to work with the active project. To make this easy we will define a variable named proj. To do this we write a typical dim statement which references the Microsoft.Office.Interop.MSProject namespace. If we were writing VBA within project we could write:
dim proj as Project
Since we are not within Project VBA we need to specify more about where the project object can be found so we write:
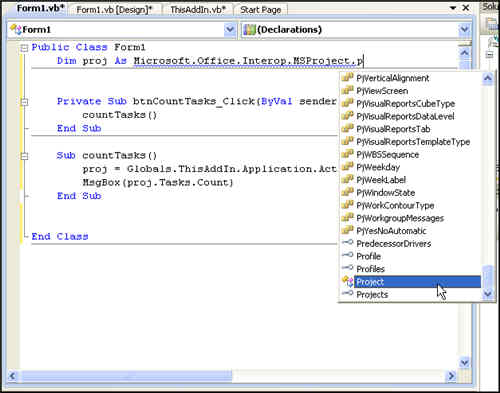
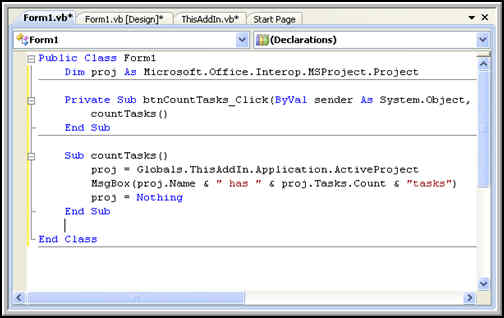
Dim proj As Microsoft.Office.Interop.MSProject.Project
The intellisense within Visual Studio will suggest to you the likely object after you type a letter or two as shown below:

defining-the-project-variable.jpg

The next thing to do is to set proj to the active project. This isn't strictly necessary, but it does make things easier. To do this we write:
proj = Globals.ThisAddIn.Application.ActiveProject
The final step is to output some things about the active project. In this case we will just use a message box to report to the user. You could have the text be displayed in a text box or on a label within the form as well. The line we are going to use to output the project name and the number of tasks is:
MsgBox(proj.Name & " has " & proj.Tasks.Count & " tasks")
Finally, after we are done reporting on the number of tasks in the project we release the proj variable by setting it to nothing:
proj = Nothing

final-code.jpg

Showing the Form

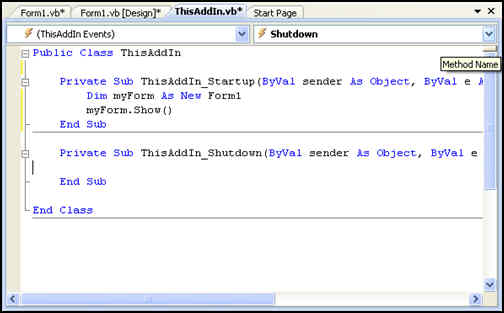
The final thing we have to do with our add-in before we can publish it is to make the form we just made show. Go back to the ThisAddIn.vb tab and in the Startup event, define a form (here I use "myForm" as the object and use the show method to display the form. In another tutorial I'll post a cleaner way of doing this by creating a menu bar and buttons to show the form. This form is just going to show when the add-in is loaded. Here is the final code for this:

show-form.jpg

Publishing the Add-in

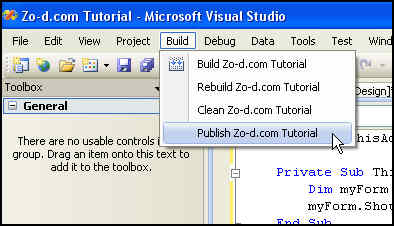
There are several options for publishing the add-in. That subject is also worth a separate post detailing all the different ways, but for now I'm just going to publish to a folder on my own hard drive. To do this go to the "Build" menu and select "Publish ..."

publish-project-addin.jpg

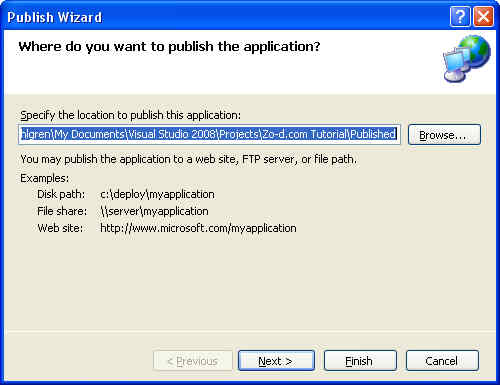
When the wizard runs, enter the location you want to publish to and click your way through the rest of the wizard. It might take a little while and when you are done you will see a notification in the lower left corner that "Publish succeeded".

publish-wizard.jpg

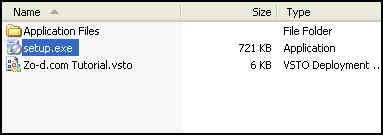
Using Windows Explorer, navigate to the location that you saved the file to and double-click the "Set-up" file.
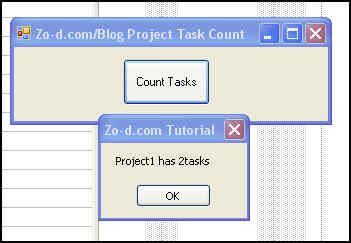
set-up.jpg

Using the Add-in

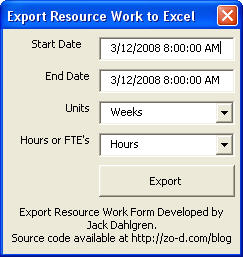
After installing, the add-in will run whenever you open project. This add-in will float above your project and can be clicked at any time. If you want to close it, just click the x.

final-add-in.jpg

If you want to disable it, go to the "Tools" menu, select "Com add-ins" and then deselect the item from the list that shows. You can also remove the Add-in by going to your Windows control panel, choosing the "Add-Remove Programs" option, find the add-in and click on "uninstall".

I hope that you found this tutorial helpful in understanding the basic principles of building and deploying a VSTO Microsoft Project Add-in. With a bit of work you can take this very rough and simplistic Add-in and create something useful and easy to deploy. Feel free to leave comments or ask questions.

UPDATE: Find the second part of this tutorial which shows how to add a command bar and command buttons here.

May 13, 2008

Office VBA for Mac After 2008

For those who work on Apple Macs there was some good news today. Microsoft announced that it is bringing back VBA support for the Macintosh version of Office. Support will be coming in the versions after 2008. Here is the text of the announcement:

VBA Returns to Future Versions of Office for Mac

The Mac BU also announced it is bringing VBA-language support back to the next version of Office for Mac. Sharing information with customers as early as possible continues to be a priority for the Mac BU to allow customers to plan for their software needs.Although the Mac BU increased support in Office 2008 with alternate scripting tools such as Automator and AppleScript -- and also worked with MacTech Magazine to create a reference guide, available at http://www.mactech.com/vba-transition-guide -- the team recognizes that VBA-language support is important to a select group of customers who rely on sharing macros across platforms. The Mac BU is always working to meet customers' needs and already is hard at work on the next version of Office for Mac.
Source: http://biz.yahoo.com/prnews/080513/aqtu077.html?.v=48

April 1, 2008

Analyze Microsoft Project Resource Usage Data In Excel

The "Analyze Timescaled Data In Excel" add-in which ships with Microsoft Project has a couple of limitations, the first is that it is not easy to find, and the second is that it is task-based only, so if you want to export resource data you are out of luck. In this post I'll show how to write your own code to export resource timescaled data and use what you have learned to export almost any sort of timescaled data you can think of.

What is Timescaled Data?
Project is different from other applications like Excel because it has a dimension of time. Tasks have values for work and cost, but also contain the time dimension in the form of duration. On a specific task, the amount of work or cost may vary during the task instead of being spread evenly across the task. Because of this users sometimes need to view this information by day or week or hours. Within project they do this using the task usage view or the resource usage view and setting the timescale the way they want to see it. But sometimes they want this data outside of project and when they try and cut and paste, they find that it is not a simple matter. The view can not simply be copied and pasted. So to do this you need help from VBA.

Using VBA to Export Data
Underneath the surface of project is a powerful programming language called Visual Basic for Applications (VBA). It can be used to do just about everything that you can do manually in Microsoft Project but it can also do things which would be quite tedious or difficult to do manually. This example presumes you know have some understanding of VBA and if you don't I suggest you read the articles I've posted here (link to programming archive). VBA can open and operate other Microsoft Office applications. In this case we will open Excel and write data into it.

The TimeScaleData Method and the TimeScaleValues Collection
The TimeScaleData method is used to get a collection of timescaled values from tasks, assignments or resources which you can iterate through or read. The syntax for TimeScaleData method is a bit complex so it needs some explanation before we get into writing our code.

expression.TimeScaleData(StartDate, EndDate, Type, TimeScaleUnit, Count)

Where expression is one of the following:
An Assignment or Assignments Collection, A Resource or Resources Collection, A Task or Tasks Collection.

StartDate is the start date for the data. The twist here is that if the date you provide falls within an interval you are requesting, the StartDate is rounded to the start of that interval. For example if you are using TimeScaleUnits of months and enter a date in the middle of the month, StartDate will "round down" to the start of the first day of the month.

FinishDate is the finish date for the data. Like StartDate it rounds, but in this case to the end of the time interval you are using.

Type is the type of data. If you leave out this parameter the default is to return work. Even if you want work it is generally best to specify the type instead of leaving it blank. There is a long list of the defined types at the end of this article but to illustrate the type here are a few examples:

  • pjAssignmentTimeScaledCumulativeCost
  • pjTaskTimeScaledPercentComplete
  • pjResourceTimeScaledWork

TimeScaleUnit is used to set the size of the time slice. By default weeks are used, but it is always good practice to set it explicitly. The possible values are:

  • pjTimescaleYears
  • pjTimescaleQuarters
  • pjTimescaleMonths
  • pjTimescaleWeeks
  • pjTimescaleDays
  • pjTimescaleHours
  • pjTimescaleMinutes

Count is the final parameter. It controls how many timescale units are grouped together. Use it if you want to group the data by a timescale which is different than the ones available. For example if you wanted your data by half years, you could set TimeScaleUnit to pjTimescaleMonths and use a Count of 6.

The TimeScaledData method returns a TimeScaleValues collection. This is a collection which contains all of the timeslices and their values. We use the TimeScaleData method on an object and use the resulting TimeScaleValues as the source of our data.

Our Export form is built around this method. The key operation is: Set TSV = r.TimeScaleData(tbStart.Value, tbEnd.Value, TimescaleUnit:=cboxTSUnits.Value, 1) Now all we need to do is build a form which will supply the correct parameters and which will export the data to Excel.

Using a Form in VBA
Many of the examples on this site or my other site (link to masamiki.com) don't ask the user for much information, but the TimeScaleData method has a number of parameters that must be supplied. And some of those parameters are selected from a list. Because of this we need to move from the simple input box to a form. A form can have a number of different controls on it. This example is kept very simple. It has Start Date and End Date text boxes. Units and Hours or FTE combo boxes and a button which will run the code to export the data. A more fully developed version could have selections for Resource, Assignment or Task and could also have a list of all possible data types.

Here is the form I put together:

export-resource-data-to-excel.jpg

Behind the form there are a number of subroutines. The first one runs when the form is first shown.

Private Sub UserForm_Initialize()
'set the start date textbox value
tbStart = ActiveProject.ProjectStart
'set the end date textbox value
tbEnd = ActiveProject.ProjectFinish
'call a subroutine to set values for Units box
fillTSUnitsBox
'call a subroutine to set values for the hours or FTE box
fillFTEBox
End Sub

The routine to fill the Units box:

Sub fillTSUnitsBox()
'sets Units constants
Dim myArray(5, 2) As String
myArray(0, 0) = "Days"
myArray(0, 1) = pjTimescaleDays
myArray(1, 0) = "Weeks"
myArray(1, 1) = pjTimescaleWeeks
myArray(2, 0) = "Months"
myArray(2, 1) = pjTimescaleMonths
myArray(3, 0) = "Quarters"
myArray(3, 1) = pjTimescaleQuarters
myArray(4, 0) = "Years"
myArray(4, 1) = pjTimescaleYears

cboxTSUnits.List = myArray
'use weeks as default value
cboxTSUnits.Value = 3
End Sub

The routine to set the Hours/FTE box

Sub fillFTEBox()
'sets choice of FTE or Hours
cboxFTE.List = Array("Hours", "FTE")
'sets to hours
cboxFTE.Value = "Hours"
End Sub

The code which runs when the button is clicked

Private Sub btnExport_Click()
exportResourceUsage
End Sub

And finally at the heart of it all the exportResourceUsage subroutine:

Sub exportResourceUsage()
'first define our variables
Dim r As Resource
Dim rs As Resources
Dim TSV As TimeScaleValues
Dim pTSV As TimeScaleValues
Dim i As Long, j As Long
'define excel variables
Dim xlRange As Excel.Range
Dim xlCol As Excel.Range
Dim xlRow As Excel.Range
Dim xlApp As Excel.Application

'open excel and set the cursor at the upper left cell
Set xlApp = New Excel.Application
xlApp.Visible = True
AppActivate "Microsoft Excel"
Set xlBook = xlApp.Workbooks.Add
Set xlsheet = xlBook.Worksheets.Add
xlsheet.Name = ActiveProject.Name
Set xlRange = xlApp.ActiveSheet.Range("A1:A1")

'start writing column headers
xlRange.Value = "Resource Name"
Set xlRange = xlRange.Offset(0, 1)
xlRange.Value = "Generic"

'use the dates from the project summary task TSV to set column headings
Set pTSV = ActiveProject.ProjectSummaryTask.TimeScaleData(tbStart.Value, tbEnd.Value, TimescaleUnit:=cboxTSUnits.Value)
For j = 1 To pTSV.Count
Set xlRange = xlRange.Offset(0, 1)
xlRange.Value = pTSV.Item(j).StartDate
Next j

'go to first cell of next row
Set xlRange = xlRange.Offset(1, -j)

'loop through all resources and write out values
Set rs = ActiveProject.Resources
For Each r In rs
If Not r Is Nothing Then
xlRange.Value = r.Name
Set xlRange = xlRange.Offset(0, 1)
If r.EnterpriseGeneric Then
xlRange.Value = r.EnterpriseGeneric
End If

Set xlRange = xlRange.Offset(0, 1)

Set TSV = r.TimeScaleData(tbStart.Value, tbEnd.Value, TimescaleUnit:=cboxTSUnits.Value)
'loop through all timescale data and write to cells
For i = 1 To TSV.Count
If Not TSV(i).Value = "" Then
'convert to FTE if FTE is set
If cboxFTE.Value = "FTE" Then
Select Case cboxTSUnits.Value
Case 0 'years
xlRange.Value = TSV(i).Value / (60 * ActiveProject.HoursPerDay * ActiveProject.DaysPerMonth * 12)

Case 1 'quarters
xlRange.Value = TSV(i).Value / (60 * ActiveProject.HoursPerDay * ActiveProject.DaysPerMonth * 3)

Case 20 'months
xlRange.Value = TSV(i).Value / (60 * ActiveProject.HoursPerDay * ActiveProject.DaysPerMonth)

Case 3 'weeks
xlRange.Value = TSV(i).Value / (60 * ActiveProject.HoursPerWeek)

Case 4 'days
xlRange.Value = TSV(i).Value / (60 * ActiveProject.HoursPerDay)

End Select
Else
'if not FTE, work hours are written
xlRange.Value = TSV(i).Value / (60)
End If
End If
Set xlRange = xlRange.Offset(0, 1)
Next i
End If
Set xlRange = xlRange.Offset(1, -(TSV.Count + 2))
Next r

'some minor excel formatting of results
xlApp.Rows("1:1").Select
xlApp.Selection.NumberFormat = "m/d/yy;@"
xlApp.Cells.Select
xlApp.Cells.EntireColumn.AutoFit
xlApp.Activate
End Sub

To keep this readable I've left out all error handling and the like. It is meant as an example of how to use the TimeScaleData method and read from the TimeScaleValues collection.

If you hadn't noticed, the code which runs when the button is clicked contains only one command. It is possible to put the whole exportResourceUsage subroutine code under the handler for that button, but by putting it in a separate subroutine, it is easier to reuse the subroutine and keep the code readable.

Now, we have the form and the code (rightclick here to save a copy of the form to your computer). The next step is getting the form to display. To do this we need to write a single line of code.

Sub showExportForm()
exportResourceTimescaledData.Show
End sub

This macro can then be assigned to a button on your toolbar. Clicking the button runs the macro which shows the form.

The TimeScaleData Type Reference
There are a large range of TimeScaleData types available and which can be used to produce everything from Earned Value S-charts to cashflows or resource availability. The types possible depend on whether you are looking at Assignment, Resource or Task data. For example, Percent Complete is only available when looking at a task or task collection. WorkAvailability is only relevant to resources.

The constants to specify the Type always follow the same format, beginning with "pj" then the type of object you are referencing (Task, Resource or Assignment), then "Timescaled" and finally the data you are looking for. For example you would use pjTaskTimescaledDataActualCost for actual cost for a task, but pjResourceTimescaledDataActualCost for costs of a specific resource.

The following are available for Tasks, Assignments, and Resources

  • ActualCost
  • ActualOvertimeWork
  • ACWP (actual cost of work performed - use in Earned Value calculations)
  • BaselineCost (and Baseline1-10 cost)
  • BaselineWork (and Baseline1-10 work)
  • BCWP (budgeted cost of work performed - used for Earned Value calculations)
  • BCWS (budgeted cost of work scheduled - used for Earned Value calculations)
  • Cost
  • CumulativeCost
  • CumulativeWork
  • CV (cost variance - used in Earned Value)
  • Overallocation
  • OvertimeWork
  • RegularWork
  • SV (schedule variance - used in Earned Value)
  • Work

The following are available for Assignments and Resources only:

  • PeakUnits
  • PercentAllocation

The following are available for Resources only:

  • RemainingAllocation
  • UnitAvailability
  • WorkAvailability

The following are available for Tasks only:

  • ActualFixedCost
  • CPI (cost performance index)
  • CumulativePercentComplete
  • CVP
  • FixedCost
  • PercentComplete
  • SPI (schedule performance index)
  • SVP

The Form which contains this code can be found here: ExportTimescaledData.zip. Unzip and then open project, hit ALT+F11 to open the visual basic editor. From the file menu in the editor select "Import File" and browse to the file. Don't forget to write a macro to make the form show like I explained earlier. It is useful to have that macro assigned to a button on the toolbar.

February 10, 2008

Bay Bridge at Sunrise

Last week was too wet to go out, but this Sunday morning we managed to catch a view of the Bay Bridge just before sunrise. This is the East span of the Bay Bridge. This cantilevered section is being replaced by a new cable-stayed span which is supposed to be more earthquake resistant.

You can see two of the piers for the new span in the shot below:

January 22, 2008

NSFW - Business Poetry

With a global stock meltdown on the rise, it seems a good time to launch my new occasional series of business poetry. Sorry, no rhymes or limericks today, but send them in and I'll publish it in the next round.

Deadwood
They are cutting the tall old trees
and the creatures in the underbrush
run searching for a home


Calling an All Hands
The leader claims
turning a battleship
in the open sea
requires 10.8 miles
It must suck to be a battleship

Procrustes
And tell me again
about your problem?
Old Procrustes asks.
I think we have
the solution.

December 21, 2007

Shortest day of the year - Winter Solstice

Today is the shortest day of the year and for many cultures there is a celebration around this time, all springing from the fact that the light of the sun is returning to the world.

December 11, 2007

Download Microsoft Office Project Server 2007 Service Pack 1 (SP1)

Microsoft has released Service Pack 1 for the Microsoft Office 2007 Suite.
Download it here:
http://www.microsoft.com/downloads/details.aspx?FamilyId=9EC51594-992C-4165-A997-25DA01F388F5&displaylang=en
The fixes cover a bunch of different applications and platforms, so it will take some consideration in rolling it out.

Good luck!

December 8, 2007

Microsoft Project Server 2007 Service Pack 1 Release Date

How the tables have turned. At the Seattle Project Conference, Microsoft hemmed and hawed about the release of Service Pack 1 mumbling about March and April. At the Madrid Project Conference word is that they came out and stated it will be December 11... this year. One can only hope that this was hastened by the questions posed at the Seattle conference, but in any case it is good news for those who are suffering.

The snarky among us would say, "Install immediately, it CAN'T be any worse!" but I say, get those test cases ready.

1 2 3 4 5 6 7 8 9 10 11 12 13 14 15 16

ALL POSTS

Creative Commons License
This weblog is licensed under a Creative Commons License.
Powered by
Movable Type 3.34